Angular 2+ fundamentals based on angular-cli created app
- Processes, standards and quality
- Technologies
- Others
For the last 2 years Angular Team at Google, with huge support of the community, has been working on a new Angular framework. It has been completely rewritten with better performance and ready to use even outside the browser. In this article I want to introduce you to the basics of Angular 2+; we will build a small web application using angular-cli tool.
TypeScript basics
If you want to start playing with Angular, you need some basic knowledge of TypeScript. Of course, you could use pure JavaScript only, but first of all framework development is mostly focused on TypeScript; what is more, it has better community support and documentation. The second reason is that the code written in TS is much cleaner and has better IDE support.
Take a look at the following comparison of component code written in TS and JS:
TypeScript
import { Component } from '@angular/core';
@Component({
  selector: 'my-app',
  template: `
Hello Angular
` }) export class AppComponent { constructor() {} }
JavaScript
(function(app) {
  app.AppComponent =
    ng.core.Component({
      selector: 'my-app',
      template: `
Hello Angular
` }).Class({ constructor: function() {} }); })(window.app || (window.app = {}));
TypeScript code is much cleaner to read and maintain.
So let’s start with some TS basics. TypeScript is a typed superset of JavaScript. To run TS code in a browser you need to compile it to JS first. Because it’s a superset of JS, you can use standard JS (ES2015 and ES5), but the real strength of this language are types which give us more control over app development, and allow to avoid a lot of bugs (e.g. the ones caused by very inconsistent type conversion in JS).
We can define types for variables, functions, arrays. Look at the examples below:
let examplePerson: Person; //variable of type Person

let personList: Person[]; // Person types array

function getPersonName (person Person): string {
    return person.name;
}
We have two variables – examplePerson of type Person and personList of type Array of Person and function with argument of type Person, which returns string result. We can also use an anonymous type “any”, but it’s not recommended unless necessary. In some situations, you can avoid using “any” by creating TypeScript generics.
Types can be defined by classes or interfaces. The main difference between those two is that a class will be compiled to JS and interface will be used only to check during development and compilation; then it will be removed.
interface Person {
    name: string;
}
Creating custom types adds some more work during development, but gives us more control and power (such as autocomplete). For example, when you have service that returns Observable of type Person – you always need to handle results as Person type – otherwise TS will return error or warning.
Angular-cli introduction and our first app
Let’s go now to angular-cli. It’s a very cool command line tool made first by the community, but then included as a part of Angular 2+ platform. To run it, we need to install it globally using npm
npm install -g angular-cli
Now, we can use newly installed cli to create new Angular project,
ng new fp-demo-app
It will take a while, because it first creates the new directory with the entire project structure and then installs all npm dependencies. After that we can jump to the directory and run dev server.
cd fp-demo-app
ng serve
After few seconds we’ll see this message:
** NG Live Development Server is running on http://localhost:4200. **
Hash: 1247c3506babc9c69f04
Time: 10244ms
chunk    {0} main.bundle.js, main.bundle.map (main) 4.53 kB {2} [initial] [rendered]
chunk    {1} styles.bundle.js, styles.bundle.map (styles) 9.96 kB {3} [initial] [rendered]
chunk    {2} vendor.bundle.js, vendor.bundle.map (vendor) 2.84 MB [initial] [rendered]
chunk    {3} inline.bundle.js, inline.bundle.map (inline) 0 bytes [entry] [rendered]
webpack: bundle is now VALID.
which means that we can enter http://localhost:4200 in a browser to see our app running (I personally recommend Chrome browser with cool Augury extension for Angular 2+ developers).
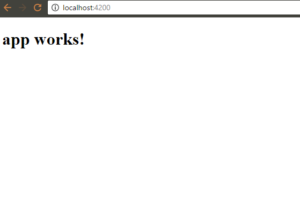
Yay! Isn’t it a pure fun for developer? 🙂
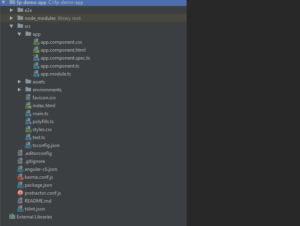
Let’s look deeper into our project structure.
In the main project directory we can find angular-cli.json file, where we can configure what and how will be created during code generation. It’s worth mentioning that angular-cli is not just a standard code generator. It also analyses the current project structure, modules, files and update them, if necessary.
In the src directory we have main.ts where our app bootstrap is placed. At this moment we don’t need to modify this file. However, this is the place where we can configure AOT compilation or Angular platform (browser, universal).
The most important place here is app directory with the root AppComponent and AppModule. Let’s take a look into the module.
import { BrowserModule } from '@angular/platform-browser';
import { NgModule } from '@angular/core';
import { FormsModule } from '@angular/forms';
import { HttpModule } from '@angular/http';

import { AppComponent } from './app.component';

@NgModule({
 declarations: [
   AppComponent
 ],
 imports: [
   BrowserModule,
   FormsModule,
   HttpModule
 ],
 providers: [],
 bootstrap: [AppComponent]
})
export class AppModule { }
At the beginning we have section with all needed imports. Then, we have our AppModule class decorated with @NgModule, which takes a special metadata object as parameter. This object defines all elements of this Angular module, and this is a special one because it’s the root module of the app.
The root module has additional property in @Ngodule – bootstrap, which defines components that should be bootstrapped at the app start. In this case it’s our root AppComponent. We also need to declare all elements that belong to this module – so it’s also AppComponent. The third property – imports – specifies external modules which we want to share in our module. By default angular-cli has imported the most useful modules, such as FormsModule, HttpModule and, of course, BrowserModule with browser specific elements, such as NgIf or NgFor directives.
And finally, the AppComponent:
import { Component } from '@angular/core';

@Component({
 selector: 'app-root',
 templateUrl: './app.component.html',
 styleUrls: ['./app.component.css']
})
export class AppComponent {
 title = 'app works!';
}
As you can see – the file structure is very similar to the module one. For most of the app elements, such as components, directives, routes, modules, services, pipes etc. it will consist of JS modules imports and a class with decorator.
In our metadata object in decorator we have 3 properties.
selector – describes html tag for our component. This one is and you can see it in the index.html file in src directory.
templateUrl – defines our template file. For our simple app we can change it to template and use template string:
template: `{{title}}
`
styleUrls – defines relative paths to style files. It can be css, sass, less or stylus files. This can be configured on initial app generation (ng new project-name –style=sass) or change defaults.styleExt property in angular-cli.json config file.
Creating Service and Component
Now, it’s time to generate our first service
ng generate service user
This creates a new file user.service.ts
import { Injectable } from '@angular/core';

@Injectable()
export class UserService {

constructor() { }

}
Now, we’ll create new User type using interface:
ng generate interface User
In newly created user.ts file add User properties.
export interface User {
   name: string;
   age: number;
}
and we can use it in our Service
import {Injectable} from '@angular/core';
import {User} from './user';

@Injectable()
export class UserService {
   private users: User[];

   constructor() {
       this.users = [{
           name: 'User1',
           age: 18
       }, {
           name: 'User2',
           age: 20
       }];
   }

   getUsers(): User[] {
       return this.users;
   }
   addUser(user: User) {
       this.users.push(user);
   }
}
Our service has private variable users of type Array and two methods – getUsers which returns whole array and addUser. It’s a good example of typing usage. In the service constructor we are initializing some example data. We also have here new @Injectable() decorator that allows this class to be injected as dependency in other classes (with all own injected dependencies), but to make this possible we need to add it to our app module as a provider:
...
import {UserService} from './user.service';

@NgModule({
 declarations: [
   AppComponent
 ],
 imports: [
   BrowserModule,
   FormsModule,
   HttpModule
 ],
 providers: [UserService],
...
Don’t forget that default provider configuration creates singleton instance of this service on module initialization.
We need new component UserListComponent
ng generate component user-list
We can find new directory user-list with component files. It was also automatically imported and added to our app module
declarations: [
 AppComponent,
 UserListComponent
],
In the constructor of this component we’ll inject UserService, and initialize the declared variable as an empty array of Users. We’re also using component lifecycle hook ngOnInit, where we use getUsers function from the service.
export class UserListComponent implements OnInit {
   public users: User[];

   constructor(private userService: UserService) {
       this.users = [];
   }

   ngOnInit() {
       this.users = this.userService.getUsers();
   }
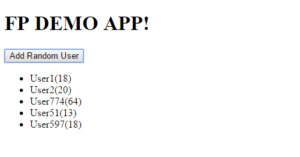
To add new user, we create an addRandomUser function, where we create a random user and add it into the users array with the help of addUser service function.
addRandomUser() {
   const newUser = {
       name: 'User' + Math.floor((Math.random() * 1000) + 1).toString(),
       age: Math.floor((Math.random() * 100) + 1)
   };
   this.userService.addUser(newUser);
}
And finally we can modify template of userList component
@Component({
selector: 'app-user-list',
template: ``, styleUrls: [’./user-list.component.css’] })
We change templateUrl to template again (this can be also done using —inline-template option when generating new component). In our template we have a button with click event listener. Notice that for events we always use braces notation (event name). All standard DOM events, such as click, keyup etc, are supported by default. In our case we call our adding function.
Below, the button we have listed, where all items are created using *ngFor directive, and render user name and age with curly braces {{ }} interpolated on view rendering.
When you look now at http://localhost:4200 and click the button few times you should see
That’s the very very basics of Angular 2+, and I hope that this article will encourage you to try more. For sure, the next thing you should try is RxJS, which you will need when using e.g. http service. The app that we have created is only for showing some examples of angular-cli usage and let you know the basic Angular elements.
The complete source code can be found on the Future Processing’s github.