Automation of the process building and deployment multi branch web application using Jenkins, Docker and Nginx
- Processes, standards and quality
- Technologies
- Others
Inspiration to writing this article has been excerpted from the lecture “Like a Panda: Flow with Bamboo” led by Jonathan Doklovic, one of Atlassian's employee, during Atlassian Summit 2013.
That lecture described potential of building and deploying feature branches. Such functionality is offered by Bamboo – software released by Atlassian itself.
Owing to the fact that the team was approaching a new project, which by definition should have a didactic element, it was decided to prepare similar solution using other, free CI tool. The choice was Jenkins, widely known and used in IT projects.
Goals
A short list of features, which should be supported by new solution, had been prepared before the project started.
- changes introduced into repository should be immediately available for the QA team and other stakeholders
- the whole process is automatic, except for elements which were declared as manual steps
- deployment of changes introduced to feature branches should give opportunity to test features in isolation (before code is merged to the master branch)
- solution is reusable and it is possible to use it in subsequent projects
How does it work?
A sample flow:
- Development process
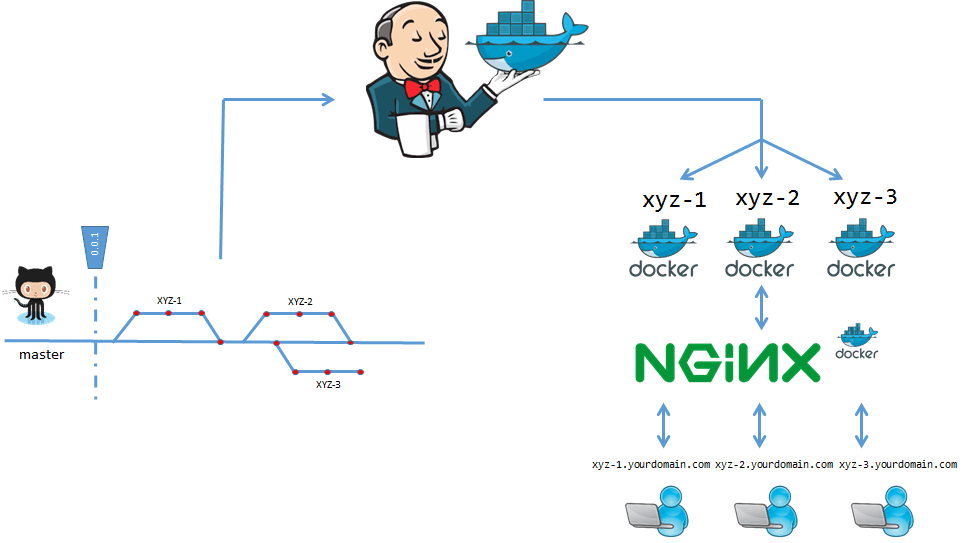
- A developer starts working on a new User Story named “Create login page” with issue number 3 within a XYZ project.
- A developer creates new branch “XYZ-3-Create-login-page”
- A developer introduces some changes and pushes branch to repository
- Jenkins creates new job with name “XYZ-3-Create-login-page”
- Jenkins runs newly created job
- Launched job creates Docker image with tag “XYZ-3-Created-login-page”
- Launched job runs container from newly created image
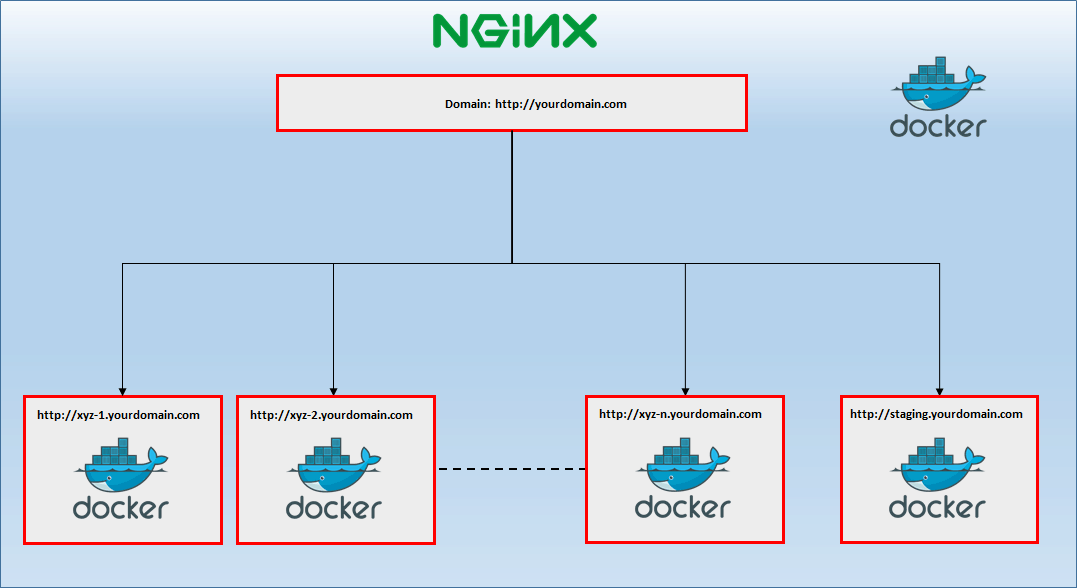
- Nginx notes launched container and creates subdomain “XYZ-3”
- Testing feature in isolated environment
- A QA gets notification that changes related to User Story have been deployed
- A QA uses “http://xyz-3.yourdomain.com” URL in order to access introduced changes
- A QA checks correctness of solution in isolation, before merging to master branch
- Merge changes
- A developer merges his branch to master branch
- A developer removes branch related to his User Story
- Jenkins removes job related to User Story
- Deploy staging environment
- Jenkins runs build related to master branch
- Launched build creates Docker image with tag “0.1.0-SNAPSHOT”
- Launched build runs container from newly created image
- Nginx notes launched container and creates subdomain “staging”
- Testing feature in staging environment
- A QA gets notification that changes related to master branch have been deployed
- A QA uses “https://staging.yourdomain.com” URL in order to access introduced changes
- A QA checks correctness of solution after merge changes to master branch
Git
Solution assumes that two kind of branches exist in repository:
- master – the main branch
- feature – a branch of this type is related to one specific User Story
It is not required to work with full featured git-flow. Nothing prevents use of some other branching concepts. The only requirement is to have the branches mentioned above. Other branches, from solution perspective, don’t matter. Jobs in Jenkins are related only to master and feature branches.
Feature branches are typical ones, however logically they play a different role. Some mechanism is needed to distinguish them from other branches. In order to do that, some naming convention is required. For such project like XYZ, feature branches can be named in that way:
[project code]-[User Story number]-[name of User Story]
e.g.
XYZ-100-Create-login-page
Regular expression which is needed to distinguish branches from feature branches is required to be introduced in Jenkins job.
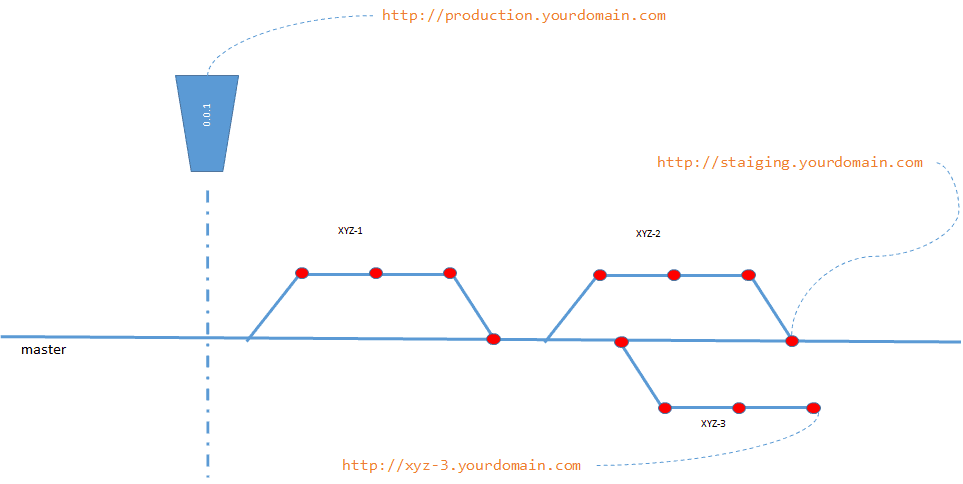
The illustration above depicts a sample structure of branches in a fake project XYZ. For such structure the following URLs are available:
- http://production.yourdomain.com – URL related to the last tag 0.1.0
- http://staging.yourdomain.com – URL related to the current state of master branch
- http://xyz-2.yourdomain.com – URL related to the current state of User Story „Login Page”
- http://xyz-3.yourdomain.com – URL related to the current state of User Story „Payments Details”
- http://xyz-5.yourdomain.com – URL related to the current state of User Story „Groups”
Domain „yourdomain.com” is not configurable. It depends on external settings.
Jenkins
When configuring Jenkins, few plugins have been applied in order to achieve desired shape:
- Environment Injector Plugin
- GIT plugin
- Multi-Branch Project Plugin
- SSH Agent Plugin
- Maven Release Plugin
Docker image has been used in order to setup Jenkins and one slave node.
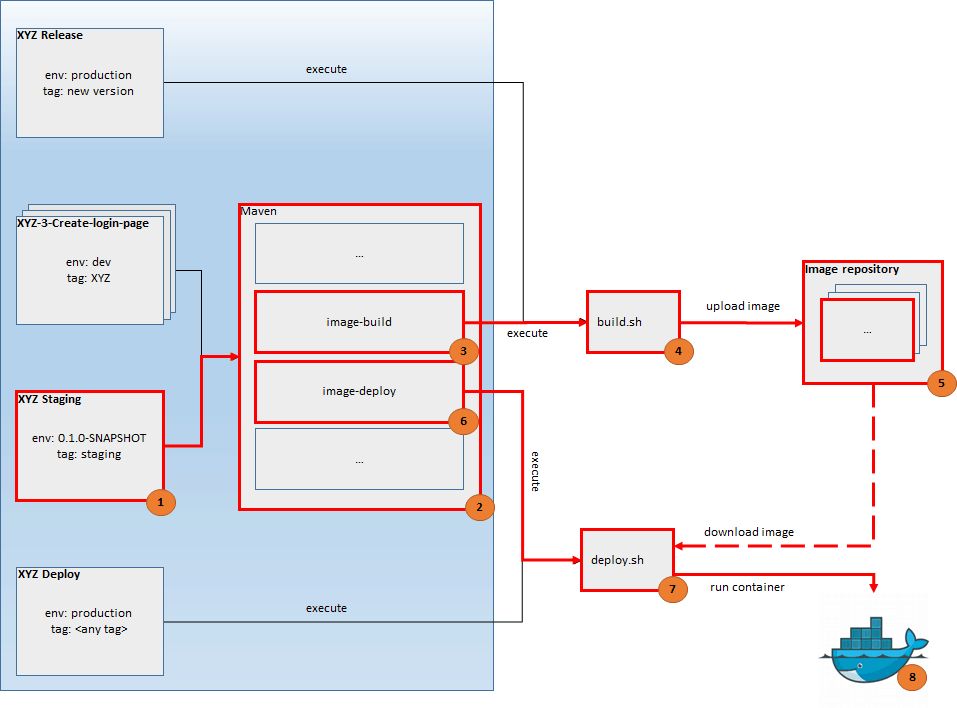
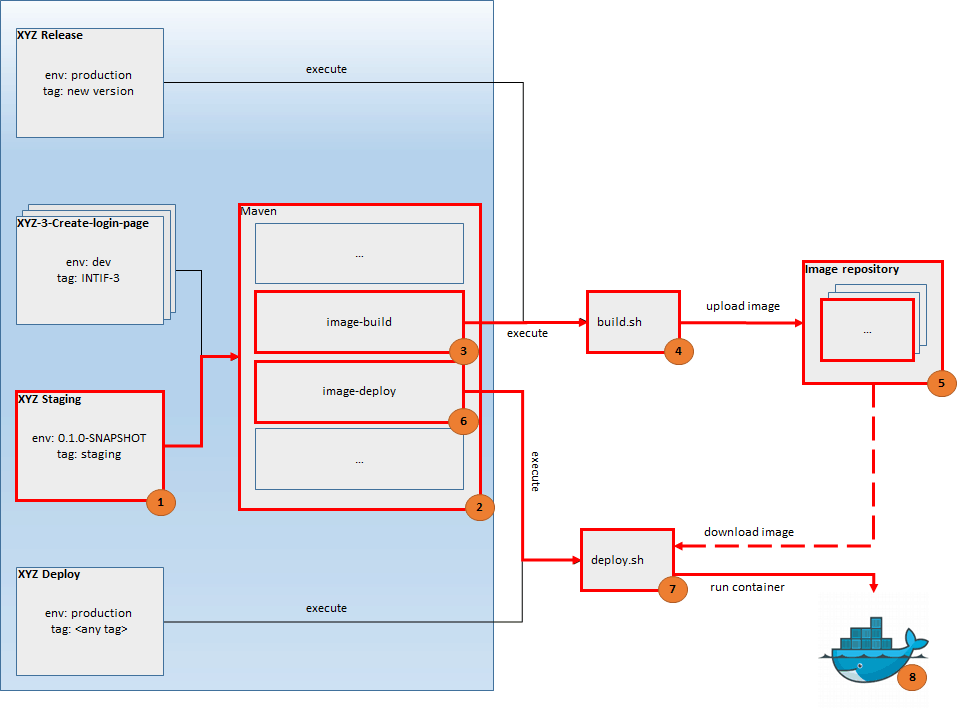
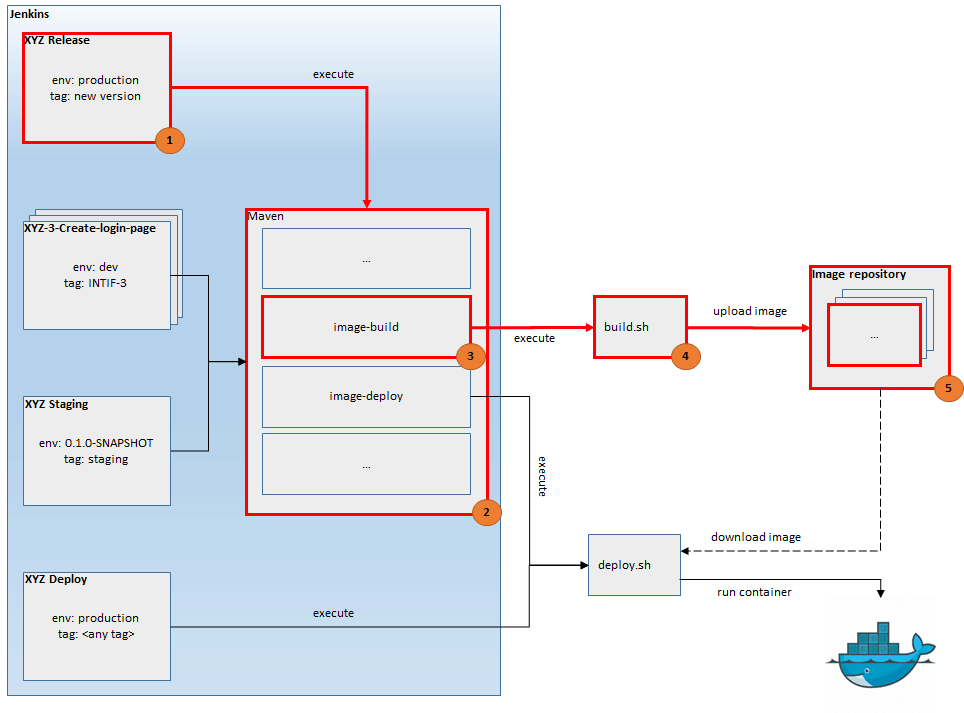
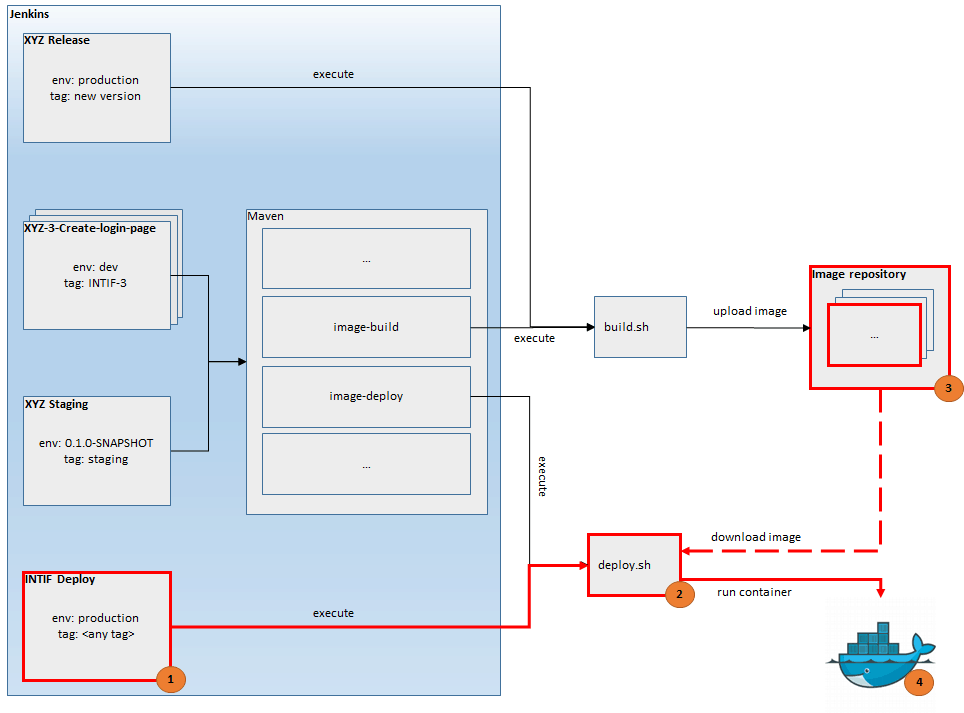
Jenkins, configured for this solution, contains 4 jobs. Their description with sketch is presented below. Important elements are marked with red border.
XYZ is a template job formed by Multi-Branch Project Plugin which allows to:
- detect branches which match against regular expression
- create job if corresponding branch appears in repository
- remove job if corresponding branch is removed from repository
- launch job if changes are introduced to that branch
Multibranch job specifies time interval when and which job template instances synchronize with corresponding branches. In the example shown below, branches synchronize every 2 minutes. Only these branches, which names do not match against “tasks/*” and “master” patterns, are tracked. Each time, when changes are introduced to these branches, Jenkins detects changes and performs appropriate action.
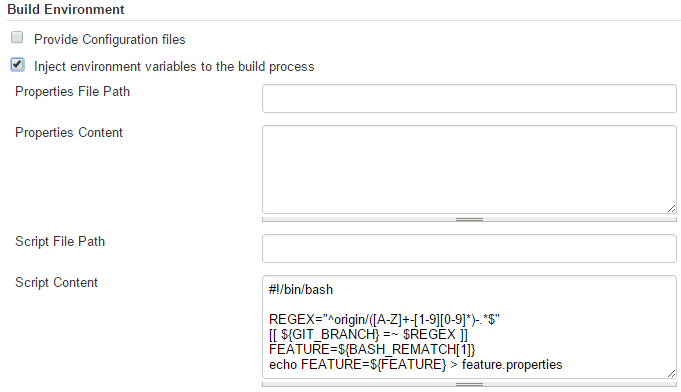
When Jenkins launches job related to specific branch, the script shown below is executed at first. From branch name, which is given in GIT_BRANCH variable, only some part is extracted (as described in “Git” section). Output string is stored in a file “featured.properties” as variable FEATURE, which is injected in the subsequent step.
At the end, Maven command is invoked. Two profiles are specified to be launched. Moreover, two parameters are passed.
- environment – a constant which is always equal “dev”
- tag – a string created as described in the section “Git” i.e. “XYZ-100”
An image-build profile launches script which is responsible for creating Docker image. Image is formed based on Dockerfile, which is presented below. JAR file with compiled application is copied to appropriate directory and port 8080 is exposed. When Docker launches a container an application automatically starts.
This Dockerfile is used by script build.sh, which is executed by an image-build profile.
FROM java:openjdk-8-jre
COPY facebook-recruitment.jar /home/facebook-recruitment/
EXPOSE 8080
ENTRYPOINT ["java", "-jar", "/home/facebook-recruitment/facebook-recruitment.jar"]
Firstly, some parameters received from Jenkins are gathered in one place. Then, an image is built and pushed to the local image repository. In order to keep everything clean, the image is removed from machine where it was created.
#!/bin/bash
IMAGE_TAG=$1
HOST_BUILD=:2375
IMAGE_NAME=:5000//:$IMAGE_TAG

docker -H $HOST_BUILD build -t $IMAGE_NAME .
docker -H $HOST_BUILD push $IMAGE_NAME
docker -H $HOST_BUILD rmi $IMAGE_NAME
When an image is pushed to repository, image-deploy profile is launched. Main goal is to execute script deploy.sh.
At the beginning, a script gathers parameters received from Jenkins. For feature branches, an image tag is equal to variable calculated by script launched in Jenkins e.g. “XYZ-100”. Docker container inherits this name in order to simplify identification which container belongs to which user story. In the next step VIRTUAL_HOST environment variable is created. More details about that variable can be found in the “Nginx” section. At the end, Docker removes existing container (if one is currently running), pulls an image from image repository and lunches container.
#!/bin/bash
IMAGE_TAG=$1
ENVIRONMENT=$2
HOST_DEPLOY=$3:2375

IMAGE_NAME=:5000//:$IMAGE_TAG

if [ $ENVIRONMENT = "dev" ]
then
   CONTAINER_NAME=$IMAGE_TAG
   VIRTUAL_HOST_CONFIG="-e VIRTUAL_HOST=$IMAGE_TAG.yourdomain.com";
elif [ $ENVIRONMENT = "staging" ]
then
   CONTAINER_NAME=$ENVIRONMENT
   VIRTUAL_HOST_CONFIG="-e VIRTUAL_HOST=$ENVIRONMENT.yourdomain.com";
else
   CONTAINER_NAME=$ENVIRONMENT
   PORT_CONFIG="-p 80:8080";
fi

docker -H $HOST_DEPLOY rm -f $CONTAINER_NAME
docker -H $HOST_DEPLOY pull $IMAGE_NAME
docker -H $HOST_DEPLOY run -d --restart=always --name $CONTAINER_NAME -e SPRING_PROFILES_ACTIVE=$ENVIRONMENT $VIRTUAL_HOST_CONFIG $PORT_CONFIG $IMAGE_NAME
As a result, the following things are obtained:
- an image for specific User Story in local image repository
- an application is deployed at https://[project name]-[User Story number].yourdomain.com
XYZ Staging is quite similar to the template job described above. It is not a template and it is much simpler. Job is launched automatically, just after Jenkins detects changes in the master branch. The Maven command is executed within that job.
clean deploy -Pimage-build,image-deploy -Dtag=${project.version} -Denvironment=staging
Similarly, “image-build” and “image-deploy” are invoked during the Maven process.
- environment – a constant which is always equal to “staging”
- tag – equal to the current application version which is hardcoded in pom.xml e.g. 0.1.0-SNAPSHOT.
As a result, the following things are obtained:
- an image with tag -SNAPSHOT in local image repository
- an application deployed at https://staging.yourdomain.com
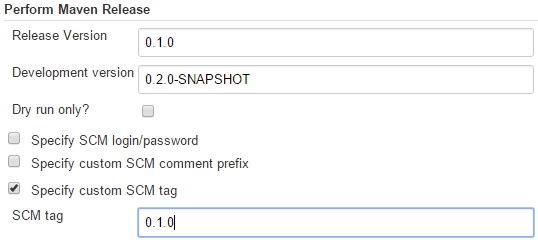
XYZ Release is manual job used for creating new releases. Maven Release Plugin is used in order to perform 3 operations:
- update version in pom.xml (i.e. from 0.1.0-SNAPSHOT to 0.1.0) and commit changes
- create tag with newly updated version
- update version in pom.xml to new SNAPSHOT (i.e. from 0.1.0 to 0.2.0-SNAPSHOT) and commit changes
Job is parametrized, so a developer has to specify stable and next snapshot version. A number of stable versions is also used as image tag. Only “image-build” profile is launched within XYZ Release.
-Dresume=false release:prepare release:perform -DreleaseProfiles="image-build" -Darguments="-Dtag=$MVN_RELEASE_VERSION";
As a result, the following things are obtained:
- an image with tag in local image repository
- an image with tag -SNAPSHOT in local image repository
XYZ Deploy is simple job used to deploy any created image to production environment. Usually, the newest image should be deployed. Job is parametrized, so a developer has to specify image tag to deploy.
The script listed below is executed
cd <path_to_deploy.sh_script>
./deploy.sh $TAG production
As a result, the following things are obtained:
- an application deployed at https://production.yourdomain.com
Nginx
In the presented solution several goals are developed:
- an application should be easily and quickly available to QA Team
- an application should include only changes from related User Story
- an application with changes from specific User Story should be launched immediately in isolation
This feature description might rise a few questions:
Q: What exactly does it mean “easily and quickly available to the QA Team”?
A: Access to application will be via link that should be easy to remember and uniquely identify a User Story.
Q: What exactly does it mean “easy to remember URL”?
A: URL will be descriptive for the QA Team and should be generated automatically according to predictable convention.
Q: What exactly does it mean “URL will be descriptive”?
A: The most descriptive for QA Team are user story JIRA’s code name e.g. XYZ-9
All answers for these questions can be found in the post written by Jason Wider: Automated Nginx Reverse Proxy for Docker. That solution seems to match mentioned assumptions. In this post Jason described how Nginx can be used as Reverse Proxy and how it is possible to use virtual host for routing between docker containers. In our case special docker image named nginx-proxy based on Nginx has been prepared. Image groups Docker containers with application by environment variable VIRTUAL_HOST. After such Nginx a container is launched, all containers with that variable are able to be accessed via appropriate subdomain. More information can be found in the post mentioned above. All steps which are needed for implementation are listed below:
- launch Jason’s Docker image on a machine which should host applications related to specific feature brunches. It is possible to achieve it by invoking the following command:
docker run -d -p 80:80 -v /var/run/docker.sock:/tmp/docker.sock:ro jwilder/nginx-proxy
Parameter -v /var/run/docker.sock:/tmp/docker.sock causes that launched Docker image has access to Docker API. It gives possibility to check other containers on the same machine in order to localize the ones, which have VIRTUAL_HOST environment variable
- launch Docker container which includes web application and set variable VIRTUAL_HOST in a proper way e.g. http://xyz-2.yourdomain.com. It is possible to achieve it by invoking command in deploy.sh script:
docker run -d --restart=always --name $CONTAINER_NAME -e VIRTUAL_HOST=$SUBDOMAIN $IMAGE_NAME
Jenkins as Docker container it is problematic to access launched application containers on another machine. Access from Docker container to another machine is possible by -H parameter. Such parameter allows to access Docker daemon which constantly listens on port 2375. The full command is presented below:
docker -H $HOST_DEPLOY:2375 run -d --restart=always --name $CONTAINER_NAME -e VIRTUAL_HOST=$SUBDOMAIN $IMAGE_NAME
In presented approach one thing is very important. The containers that are proxied must expose the port to be proxied, either by using the EXPOSE directive in their Dockerfile or by using the –expose flag. In presented solution variable EXPOSE is configured in dockerfile:
FROM java:openjdk-8-jre
COPY facebook-recruitment.jar /home/facebook-recruitment/
EXPOSE 8080
ENTRYPOINT ["java", "-jar", "/home/facebook-recruitment/facebook-recruitment.jar"]
After these steps an application should be available on the address which was passed by VIRTUAL_HOST parameter. Sketch of that approach is presented below:
Conclusions
Created solution performed well in the conducted project. However, there are some things that could be created and some, which require further improvements. All these things have been listed below:
- Notifications about successful deployment of feature branch
In the current shape, Jenkins informs only about build failure by sending appropriate email. It is a standard behaviour, which forces developer to introduce required fixes to make the build stable. However, there is not information that feature branch has been successfully deployed. To solve that problem, creating proper comments in Jira issues would be beneficial. Jira Issue Updater Plugin offers such functionality. Comment could contain a list of mentioned people and URL address which redirects to newly deployed version of application. - Automatic removal of existing Docker containers
Environment, which has been created for specific User Story, has to be removed manually. Multi-Branch Project Plugin detects only when branch is created or removed. It does not give possibility to trigger any custom action when such event occurs. It means that some scheduling mechanism has to be setup to remove environments which are not needed anymore (because related branches are removed) - Docker images backup
Because of images size they are stored in local image repository. It helps to reduce time for uploading/downloading such images. Unfortunately, there is no backup mechanism. - Reusability
The resulting solution only seems to be reusable. Unfortunately, subsequent projects revealed that many things were not well thought out. Solution has been created for stateless project, without any database. In the subsequent projects some changes would be required to create new database for every User Story. Some data initialization would be beneficial for testing purposes. Moreover, problem occurs when it is require to pay for each environment created for feature branch. A project, which is developed and hosted using e.g. AWS, will consume large amount of money.
