
Dependency Injection with Dagger 2
- Processes, standards and quality
- Technologies
- Others
Dagger2 is a relatively young jVM dependency injection framework. It’s the second version of the popular Dagger framework developed by Square Inc.Relations between classes in applications are represented by directed acyclic graph, so that’s why this framework is called DAGger.
In Dagger2 terminology you may encounter three main keywords:
- dependency
- module
- component
In short: component provides required dependencies which are defined in modules.
To explain Dagger2 terminology and concepts, I will use some Android code that is a part of an application showing Github repositories in a form of a simple list. However, knowledge about Android is not required here.
Dependency
Dagger2 annotations are consistent with JSR-330 specification. If you have some experience with Google Guice, then using Dagger2 should be easier as annotations are the same.
Dagger2 is able to inject dependencies in the following ways:
- field injection
- constructor injection
- method injection
First two are the prefered way. In Android world, objects like activity or service are instantiated by Android framework, so you cannot use constructor injection in these cases. You have to inject fields manually and in most cases it is done in the onCreate method:
 @Inject
    GitHubService github;

    @Override
    protected void onCreate(Bundle savedInstanceState) {
        super.onCreate(savedInstanceState);
        DaggerDemoApplication.component().inject(this);
        loadData();
    }
It’s quite simple to figure out that injection is done by calling inject(this) method on a component object, which will be described later. In case of constructor injection it’s even simpler:
  GitHubService github;

    @Inject
    public SomeObject(GitHubService github){
        this.github = github;
    }
Module
Modules encapsulate knowledge of how to construct the objects you want to inject. This knowledge is defined in a module class, which have methods annotated by @Provides annotation. Returned type in this methods is the type which you want to inject:
@Module(includes = ApiModule.class)
public class ReleaseApiModule {
       @Provides @Singleton GitHubService provideGitHubService(RestAdapter restAdapter) {
           return restAdapter.create(GitHubService.class);
       }

       @Provides @Singleton Endpoint provideEndpoint() {
           return Endpoints.newFixedEndpoint(ApiModule.PRODUCTION_API_URL);
       }

}
To understand Dagger2 flow you don’t need to worry about the body of the above example methods. In the most general matter, returned type GitHubService in provideGitHubService method is the object which has been injected in the previous paragraph.
Moreover, knowledge aggregated in modules can be used in modules itself. Please note that provideGitHubService method has one argument of RestAdaptertype. This dependency is defined in „parent” module named ApiModule. ApiModule is included to ReleaseApiModule and this relation is defined in @Module annotation. ApiModule definition:
@Module
public class ApiModule {
    public static final String PRODUCTION_API_URL = "https://api.github.com";

    @Provides @Singleton Client provideClient(Application app) {
        return new OkClient(DataModule.createOkHttpClient(app));
    }

    /*
    Endpoint object is delivered by specific child module (Release or Debug)
     */
    @Provides
    @Singleton
    RestAdapter provideRestAdapter(Endpoint endpoint, Client client) {
        return new RestAdapter.Builder()
                .setClient(client)
                .setEndpoint(endpoint)
                .build();
    }
}
In ApiModule you can see the method which provides RestAdapter. RestAdapter instance created in such a way is injected in ReleaseApiModule. Construction of RestAdapter is independent of debug/release build, so it can be defined in ApiModule. However, it requires Endpoint dependency. Endpoint could vary between debug/release version, that’s why we specified Endpoint in ReleaseApiModule.
For now, we can show providing dependency in the following diagram:
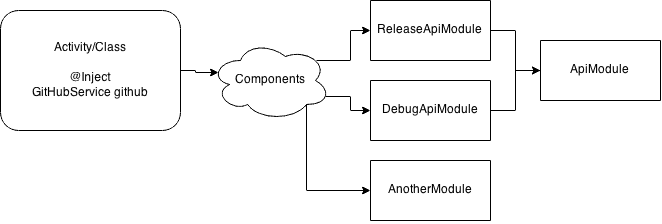
Components are shown as cloud, which we will discuss in a moment. Treat it as an intermediate object, allowing access to objects defined in modules. I’ve added AnotherModuleclass to the diagram, to keep in mind that we can add multiple modules to the components. DebugApiModule allows to mock backend behaviour and it can change application’s behaviour in debug variant (Android-build variants are explained at the end of this post).
Components
Components are interfaces (or abstract classes) which you define yourself. Such interface may contain two types of methods:
- methods which return object and have no parameters
- methods which return void but have one argument
In the first case, returned object is an instance created by Dagger2 and all dependencies are provided by constructor injection. Component could be defined as follows :
public interface SomeComponent {
    GitHubService githubService();
}
Second type of method allows injecting non-private field members to provided object as argument. Injecting members is very useful in Android development. As I’ve mentioned earlier, we cannot use constructor injection, since we don’t create instances of some types e.g. Activity. That’s why, we have to define the interface, which describes for which types we want to use members injection. In our case it’s called DaggerDemoGraph.
public interface DaggerDemoGraph {
	void inject(MainActivity mainActivity);

	void inject(RepositoriesListActivity repositoriesListActivity);
}
However, it’s only a contract. All code required to handle such injections is generated by Dagger2 using annotation processing mechanism. You probably noticed that we don’t have @Component annotation on the above interface. Don’t worry, we’ll handle it in a minute. Let’s look at another code:
@Singleton
@Component(modules = { MainModule.class, ReleaseDataModule.class, ReleaseApiModule.class })
public interface DaggerDemoComponent extends DaggerDemoGraph {
    static final class Initializer {
        private Initializer() {
        } // No instances.

        public static DaggerDemoComponent init(DaggerDemoApplication app) {
            return Dagger_DaggerDemoComponent.builder()
                                          .mainModule(new MainModule(app))
                                          .build();
    	 }
    }
}
This is an application scope component, which is a central point of Dagger2 usage. Firstly, it determines which modules it uses. In this case it’s a release component, so we’re using release modules. Secondly, it extends DaggerDemoGraph interface, which has been defined previously. So now we have ancomplete component, which knows for which types it injects (from inject methods in DaggerDemoGraph interface) and how to satisfy dependencies (from modules and their methods with @Provides annotation).
Now, we need to initialise whole dependency graph. You can treat such graph as a component which is initialised in the following way:
DaggerDemoGraph graph = DaggerDemoComponent.Initializer.init(instance);
In Android, such initialisation should be done in your application class, to keep the instance of created graph throughout application’s lifecycle.
Dagger2 generates builder class to create your component. As we’ve seen, the component is built from modules, so we need to provide instances of them. Please look again at DaggerDemoComponent interface and it’s internal static class. Maybe you’ve noticed that we created only MainModule instance by hand. Dagger2 is able to create instances for us, if there is a default no-arg constructor. In our case this rule applies to ReleaseDataModule and ReleaseApiModule. This behaviour is handled in build() method in generated Builder class:
 public DaggerDemoComponent build() {
  	if (mainModule == null) {
    	    throw new IllegalStateException("mainModule must be set");
  	}
  	if (debugDataModule == null) {
    	    this.debugDataModule = new DebugDataModule();
  	}
       // few more ifs here, removed for sake of brevity
 }
Android integration and build variants
This section is focused mostly on Android. To easily handle debug/release version of application we can utilise great feature of build tools i.e. debug and release folders. Following file hierarchy allows us to change the behaviour of our application using different Dagger2 component and used modules.
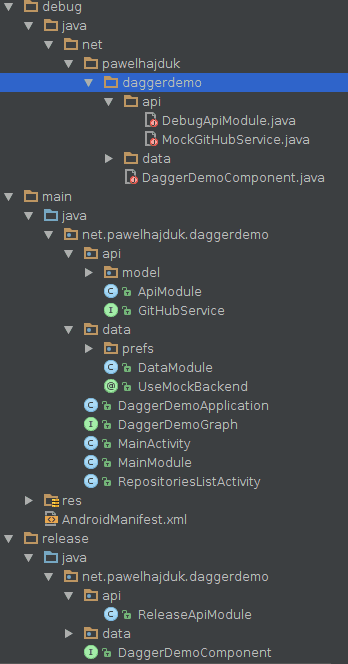
Note that DaggerDemoComponent class is defined twice, in debug and in release folder. This way, in the debug variant we will use component with debug modules and in the release we will use release-specific modules. Additionally, we can create build variant-specific classes like MockGitHubService, which allows us to mock backend during the development only in the debug variant.
Conclusion
Little more extended (Android) example can be found at Github repository. It also contains scoped bindings, which is not covered in this post. However, Dagger2 is not an Android-specific dependency injection framework. Its flexibility and performance due to utilising annotation processor makes this framework a really great tool.
