Fast prototyping with Spring Boot
- Processes, standards and quality
- Technologies
- Others
So far, Spring framework has been associated with being an alternative for EJB, but also with developer’s great effort in the initial phase of the project. Creating a simple project, which would use Dependency Injection offered by Spring, wasn’t very problematic. However, some issues appeared when the project had to use greater number of modules e.g. spring web, spring security or spring data. Appropriate configuration of a project could be counted in hours, because it always appeared that the new version has some changes or isn’t compatible with spring security in the one we wanted to use. When a project is planned from a few to several months it isn‘t a problem to dedicate one day to appropriate configuration. However, it looks totally different when we need fast prototype to make sure that our solution makes sense. In this case we can’t afford wasting precious hours. The solution to this problem is Spring Boot. It offers a simple mechanism which doesn’t require any additional configuration if we want to create a simple application.
Let’s get it started – Creating the project
Creators of Spring Booth have thought about how to minimise the time of creating projects using this framework. Owing to the created website http://start.spring.io/ it is possible to automatically generate project with dependencies indicated by the user.
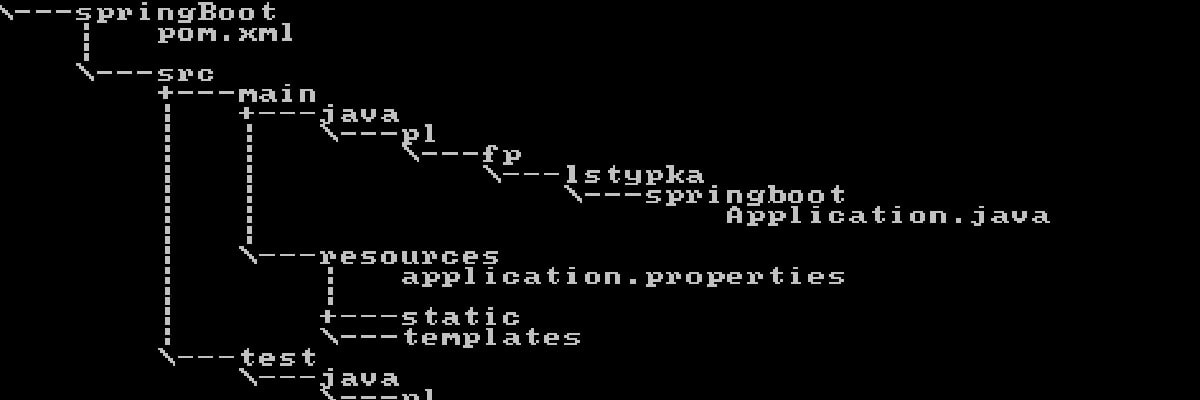
Developer can use up to 24 different styles (its number is dynamically growing), which can be freely mixed with each other. Here, we can also choose a tool needed to build the project: Maven or Gradle. For the beginning, I chose Web and Maven, so quite a standard set. Generated project has the following structure:

It isn’t hard to notice that the number of generated files is minimal: one file containing main method, one file with tests, one proper file and pom.xml file containing all the dependencies in the project. As you may have already guessed, the whole control centre is located in the pom.xml file. It is where we can add further modules, which we would like to use in our application. It’s high time to take a closer look at them.
	4.0.0

	pl.fp.lstypka
	springBoot
	0.0.1-SNAPSHOT
    jar

	Spring Boot Demo
	Spring Boot Demo


		org.springframework.boot
		spring-boot-starter-parent
		1.1.4.RELEASE


			org.springframework.boot
			spring-boot-starter-web


			org.springframework.boot
			spring-boot-starter-test
			test


		UTF-8
		pl.fp.lstypka.springboot.Application
		1.7


				org.springframework.boot
				spring-boot-maven-plugin
The most important part is a ’spring-boot-starter-parent’ declaration. It is the parent project which contains all the plugins connected with building a project. In turn, its parent project contains all modules which can be added to our application. The only thing to do is to add a dependency in order to use a given module:
		org.springframework.boot
		{articact}
Where {artefact} may be one of the modules:
- spring-boot-starter-web
- spring-boot-starter-websocket
- spring-boot-starter-freemarker
- spring-boot-starter-velocity
- spring-boot-starter-groovy-templates
- spring-boot-starter-thymeleaf
- spring-boot-starter-actuator
- spring-boot-starter-security
- spring-boot-starter-batch
- spring-boot-starter-jdbc
- spring-boot-starter-integration
- spring-boot-starter-amqp
- spring-boot-starter-aop
- spring-boot-starter-data-jpa
- spring-boot-starter-data-mongodb
- spring-boot-starter-redis
- spring-boot-starter-data-gemfire
- spring-boot-starter-data-solr
- spring-boot-starter-data-rest
- spring-boot-starter-remote-shell
- spring-boot-starter-mobile
- spring-boot-starter-social-facebook
- spring-boot-starter-social-linkedin
- spring-boot-starter-social-twitter
- spring-boot-starter-test
Talk to me – exposing API to the world
Very often, we want the created prototype to be a small part of something bigger, so that the existing system could communicate with it in some way. One of the natural choices is to get rest API. Let’s assume that we create a prototype of an application, which main objective is to manage abstract tasks, i.e. saving a new task and returning a particular one. For this purpose we need the following model:
public class Job implements Serializable {

	private static final long serialVersionUID = 1L;

	private Integer id;
	private String name;
	private JobStatus status;

      // constructors, getters and setters
}


public enum JobStatus {

	NEW, IN_PROGRESS, SUCCESS, ERROR
}
Having already defined the model we can skip to defining controller methods. To this end we create new controller, i.e. JobController:
@RestController
@RequestMapping("/jobs")
public class JobController {

	private List jobs = new ArrayList<>();

	@RequestMapping(value = "/{jobId}", method = RequestMethod.GET)
	@ResponseBody
	public ResponseEntity getJob(@PathVariable("jobId") Integer jobId) {
		for (Job job : jobs) {
			if (job.getId().equals(jobId)) {
				return new ResponseEntity<>(job, HttpStatus.OK);
			}
		}
		return new ResponseEntity<>((Job)null, HttpStatus.NOT_FOUND);
	}

	@RequestMapping(method = RequestMethod.POST)
	@ResponseBody
	public ResponseEntity storeJob(@RequestBody Job job) {
		jobs.add(job);
		return new ResponseEntity<>(job, HttpStatus.CREATED);
	}

	@RequestMapping(method = RequestMethod.GET)
	@ResponseBody
	public ResponseEntity<List> getJobs() {
		return new ResponseEntity<>(jobs, HttpStatus.OK);
	}
}
The controller contains three methods used to add new task, get it with a help of identifier and the last one to get all tasks. In less than 10 min we managed to create RESTful web-service. To check if it really works, we just build a project using „mvn clean install” request and then start the outcome jar file from the target catalogue:
java -jar springBoot-0.0.1-SNAPSHOT.jar
Application will be started by default in 8080 port, to get a list of all tasks it is necessary to call for localhost:8080/jobs. After performing the above mentioned command we automatically start embedded tomcat, where our application has been deployed. If, for some reason, we want to start the server on a different port rather than the default one (8080), we should add the following information concerning port to the application.properties file.
server.port = 8090
It might seem quite puzzling, where the embedded tomcat came from in our project, since we haven’t declared it anywhere. We didn’t have to, because it is a part of spring-boot-starter-web:
	org.springframework.boot
	spring-boot-starter-tomcat
Therefore, it is worth checking what precisely is a part of a given module that we would like to use.
Remember me – prototype with database
A significant part of applications uses some kind of database. Spring Boot is also helpful in this matter allowing to start database by adding only two dependencies. Let’s try to use in-memory HSQLDB database. For this purpose let’s pass to the pom.xml file and change it a little bit.
	org.springframework.boot
	spring-boot-starter-data-jpa


	org.hsqldb
	hsqldb
	runtime
Owing to the use of annotation @EnableAutoConfiguration in Application class, we don’t have to add entity to the persistence.xml file. Spring will do this for us and will take into consideration all entities marked as annotations @Entity, @Embeddable, and @MappedSuperclass. Having configured the base we create entity class:
@Entity
public class JobEntity {

	@Id @GeneratedValue(strategy=GenerationType.IDENTITY)
	private Integer id;

	private String name;

	private String status;

	// getters and setters
}
With ready entity we can think about DAO class. In our case, we expect only two methods from DAO class: save and get. So far, it has required writing the following class:
@Component
public class JobDao {

	@Autowired
	public EntityManager entityManager;

	public Job save(Job job) {
		JobEntity jobEntity = new JobEntity();
		jobEntity.setName(job.getName());
		jobEntity.setStatus(JobStatus.NEW.name());
		entityManager.persist(jobEntity);
		return new Job(jobEntity.getId(), jobEntity.getName(), JobStatus.valueOf(jobEntity.getStatus()));

	}

	public Job get(Integer jobId) {
		JobEntity foundJob = entityManager.find(JobEntity.class, jobId);
		return new Job(foundJob.getId(), foundJob.getName(), JobStatus.valueOf(foundJob.getStatus()));
	}
}
However, Spring Data provides us with mechanism generating repositories. It is sufficient to create interface extending the
CrudRepository one.
public interface JobDao extends CrudRepository<JobEntity, Integer> {
}
That’s it, it doesn’t require any implementation of the interface. We don’t have to waste our time on writing the same operations (save, delete, update, search by ID) for every single entity in a project. Having ready DAO we can create a service and update controller:
@Component
public class JobService {

	@Autowired
	private JobDao jobDao;

	@Transactional
	public Job getJob(Integer jobId) {
		JobEntity entity = jobDao.findOne(jobId);
		return entityToApi(entity);
	}

	@Transactional
	public List getJobs() {
		Iterable entities = jobDao.findAll();
		List jobs = new ArrayList<>();
		for (JobEntity entity : entities) {
			jobs.add(entityToApi(entity));
		}
		return jobs;
	}

	@Transactional
	public Job saveJob(Job job) {
		JobEntity jobEntity = apiToEntity(job);
		jobEntity = jobDao.save(jobEntity);
		return entityToApi(jobEntity);
	}

	private JobEntity apiToEntity(Job job) {
		return new JobEntity(job.getId(), job.getName(), job.getStatus().name());
	}

	private Job entityToApi(JobEntity entity) {
		return entity == null ? null : new Job(entity.getId(), entity.getName(), JobStatus.valueOf(entity.getStatus()));
	}
}
@RestController
@RequestMapping("/jobs")
public class JobController {

	@Autowired
	private JobService jobService;

	@RequestMapping(value = "/{jobId}", method = RequestMethod.GET)
	@ResponseBody
	public ResponseEntity getJob(@PathVariable("jobId") Integer jobId) {
		Job job = jobService.getJob(jobId);
		if (job == null) {
			return new ResponseEntity<>(job, HttpStatus.NOT_FOUND);
		}
		return new ResponseEntity<>(job, HttpStatus.OK);
	}

	@RequestMapping(method = RequestMethod.POST)
	@ResponseBody
	public ResponseEntity storeJob(@RequestBody Job job) {
		job = jobService.saveJob(job);
		return new ResponseEntity<>(job, HttpStatus.CREATED);
	}

	@RequestMapping(method = RequestMethod.GET)
	@ResponseBody
	public ResponseEntity<List> getJobs() {
		List jobs = jobService.getJobs();
		return new ResponseEntity<>(jobs, HttpStatus.OK);
	}

}
An additional layer of abstraction, i.e. services layer, has been introduced to the latest version of our application in comparison to the previous version. A declarative transaction (@Transactional) has been applied in it, so that Spring could take over responsibility for starting transactions, approving them or withdrawing.
It is worth noticing that we didn’t have to declare any configuration for a declarative transaction, Spring Boot did that for us.
The last step is to change the controller so that its methods would use prepared service. In this way, it took us another few minutes to create web-service, which uses in-memory database. What if we don’t want to use in-memory database? It couldn’t be easier. We just add a few lines in application.properties files:
spring.datasource.url=jdbc:mysql://localhost/boot
spring.datasource.username=bootuser
spring.datasource.password=bootpass
spring.datasource.driverClassName=com.mysql.jdbc.Driver
Then, add MySql driver to the pom.xml file
		mysql
		mysql-connector-java
That’s how we have created an application which communicates with MySQL base. Creating the whole project lasted less than half an hour.
Summary
Spring Boot seems to be a very interesting and helpful framework, especially useful in prototyping. It enables to create fully functional application in several minutes. Another great advantage of using Spring Boot is the fact that a developer doesn’t have to take care of versions of given modules. Those versions are defined in the parent project, and a developer only has to point modules he/she would like to use.
Maybe next time instead of spending few hours on configuring project prototype it is worth trying Spring Boot?
Link: http://docs.spring.io/spring-boot/docs/1.1.4.RELEASE/reference/html/