Open source Android libraries every programmer should know
- Processes, standards and quality
- Technologies
- Others
During development of Android applications we often encounter problems of a similar type. Writing similar code quickly becomes boring and monotonous and what is more important, it becomes a waste of precious time. Many of those problems have already found a solution, e.g. in open source libraries, which allows us to focus on solving real problems of the domain and delivering features important to the business side. Following good coding practice of DRY and not to reinvent the wheel again we should know a number of already-made solutions.
In this article we present a few libraries that every Android developer should know.
Views mapping
The first problem we try to solve is mapping xml layouts into Java classes. Typically, this is done as shown in Listing no. 1.
public class SampleNormalActivity extends Activity {

	private Button button;

	@Override
	protected void onCreate(Bundle savedInstanceState) {
		super.onCreate(savedInstanceState);
		setContentView(R.layout.activity_sample);

		button = (Button) findViewById(R.id.button);
	}
}
Listing no. 1
Each invocation of findViewById() method along with proper casting hides true meaning of the code.
Imagine that we need to find a dozen views. In this case, half of the screen is occupied by low important mapping views to Java objects.
Help comes along with a library, written by the master of Android’s open-source world, Jake Wharton. The library is named Butter Knife. Used in this library annotation processor can replace traditional search views by adding annotations to the fields in the class, as shown in Listing no. 2.
public class SampleLibsActivity extends Activity {

	@InjectView(R.id.button)
	protected Button button;

	@Override
	protected void onCreate(Bundle savedInstanceState) {
		super.onCreate(savedInstanceState);
		setContentView(R.layout.activity_sample);
		ButterKnife.inject(this);
	}
}
Listing no. 2
In this case, the only line of code, which must be included in the method onCreate () is Butterknife.inject(this). This method notifies the library for which classes code should be generated. The disadvantage is that the field to be “injected” can not have private access modifier. The library requires that all views must be at most protected. Although the @InjectView annotation is used, you should know that it has nothing common with dependency injection. The library only generates code while compiling java classes. The greatest advantage of using this library is improvement in code readability by eliminating findViewById() method calls.
What is important we can “inject” views anywhere in the code. Listing no. 3 shows how to use this mechanism in fragments and Listing no. 4 shows the implementation of the View Holder pattern.
Due to the difference in lifecycles of activity and fragment, we must remember to set the views to null in onDestroyView() method when injecting in a fragment. Fortunately, Butter Knife has method reset(). Exemplary onDestroyView() method is shown in Listing no. 3.
public class SampleLibsFragment extends Fragment {

	@InjectView(R.id.text)
	protected TextView text;

	@Override
	 public View onCreateView(LayoutInflater inflater, ViewGroup container, Bundle savedInstanceState) {
		View view = inflater.inflate(R.layout.fragment_sample, container, false);
		ButterKnife.inject(this, view);
		return view;
	}

	@Override
	public void onDestroyView() {
		super.onDestroyView();
		ButterKnife.reset(this);
	}
}
Listing no. 3
protected class ViewHolder {

		@InjectView(R.id.text)
		protected TextView text;

		protected ViewHolder(View rootView) {
			ButterKnife.inject(this, rootView);
		}
	}
Listing no. 4
Another part that obscures readability of any application code handles all kinds of events received from the views. Also in this case the Butter Knife library offers a solution. Listing no. 5 shows the classic way of defining click listeners on the button and on the list item. Unfortunately, this method generates a lot of unnecessary code that is placed mostly in the onCreate method, which hides the relevant, application logic. Listing no. 6 shows how you can define methods that achieve the same result with less code, thanks to ButterKnife’s annotations.
button.setOnClickListener(new View.OnClickListener() {
	@Override
	public void onClick(View v) {
		Toast.makeText(SampleNormalActivity.this, "Normal OnClickListener", Toast.LENGTH_SHORT).show();
	}
});

list.setOnItemClickListener(new AdapterView.OnItemClickListener() {
	@Override
	public void onItemClick(AdapterView<?> parent, View view, int position, long id) {
		Toast.makeText(SampleNormalActivity.this, position + "\titem clicked", Toast.LENGTH_SHORT).show();
	}
});
Listing no. 5
@OnClick(R.id.button)
protected void onButtonClicked() {
	Toast.makeText(this, "OnClickListener called by Butterknife", Toast.LENGTH_SHORT).show();
}

@OnItemClick(R.id.list)
protected void onListItemClicked(int position) {
	Toast.makeText(this, position + "\titem clicked - OnItemClickListener called by Butterknife", Toast.LENGTH_SHORT).show();
}
Listing no. 6
Improvement in the readability is clearly visible. Also the logic is not mixed with typical repetitive code, which is needed only to configure the views or to event handling.
Boilerplate code
The second problem, we will try to solve is boilerplate code which is a large amount of code that is very similar in each application. Writing once again the implementation of Parcelable interface or access to SharedPreferences is tedious and does not bring any benefit, instead, it is only a waste of time. Hrisey library was created to circumvent this very problem. It works by generating code, thus without any runtime penalty. This library is inspired by Java’s library – Lombok.
If you ever wrote a class that should be parcelable, you definitely know the code shown in Listing no. 7. What part of this code has value for a developer? The truth is that only two fields that we want to be parceled have value.
public class SampleNormalParcelableModel implements Parcelable {

	private double sampleDouble;
	private int sampleInt;

	@Override
	public int describeContents() {
		return 0;
	}

	@Override
	public void writeToParcel(Parcel dest, int flags) {
		dest.writeDouble(sampleDouble);
		dest.writeInt(sampleInt);
	}

	public SampleNormalParcelableModel(Parcel source) {
		sampleDouble = source.readDouble();
		sampleInt = source.readInt();
	}

	public static final Parcelable.Creator CREATOR = new Parcelable.Creator() {

		@Override
		public SampleNormalParcelableModel createFromParcel(Parcel source) {
			return new SampleNormalParcelableModel(source);
		}

		@Override
		public SampleNormalParcelableModel[] newArray(int size) {
			return new SampleNormalParcelableModel[size];
		}
	};
}
Listing no. 7
Let’s see in Listing no. 8 how a class might look like after removing all the unnecessary code. After adding annotations there are only two fields that we want to be parceled.
@hrisey.Parcelable
public class SampleLibsParcelableModel implements Parcelable {

	private double sampleDouble;
	private int sampleInt;
}
As you can see the code using the aforementioned library becomes pure, without unnecessary methods and fields, which are needed only for system and never for programmer.
Another very frequently occurring issue is writing and reading the SharedPreferences. Code shown in Listing no. 9 should not be strange to any Android developer. The whole class is needed just to save few primitives to a non-volatile memory.
public class SampleNormalSharedPreferences {

	private static final String FLOAT_KEY = "floatKey";
	private static final String INT_KEY = "intKey";

	private final SharedPreferences sharedPreferences;

	public SampleNormalSharedPreferences(SharedPreferences sharedPreferences) {
		this.sharedPreferences = sharedPreferences;
	}

	public float getFloat() {
		return sharedPreferences.getFloat(FLOAT_KEY, 0.0f);
	}

	public void setFloat(float floatToSave) {
		sharedPreferences.edit().putFloat(FLOAT_KEY, floatToSave).apply();
	}

	public boolean containsFloat() {
		return sharedPreferences.contains(FLOAT_KEY);
	}

	public void removeFloat() {
		sharedPreferences.edit().remove(FLOAT_KEY).apply();
	}

	public int getInt() {
		return sharedPreferences.getInt(INT_KEY, 1000);
	}

	public void setInt(int intToSave) {
		sharedPreferences.edit().putInt(INT_KEY, intToSave).apply();
	}

	public boolean containsInt() {
		return sharedPreferences.contains(INT_KEY);
	}

	public void removeInt() {
		sharedPreferences.edit().remove(INT_KEY).apply();
	}
}
Listing no. 9
How many unnecessary fields and methods are in this code? Almost all. Let’s look at Listing no. 10. which shows how this class looks like after applying Hrisey’s @Preferences annotation.
@Preferences
public class SampleLibsSharedPreferences {

	private float floatToSave;
	private int intToSave = 1000;
}
Listing no. 10
The code becomes very clear, while the methods listed in Listing no. 9 are automatically generated and ready to use.
The final issue, which Hrisey will help us solve is mechanism „instance state”, i.e. reading and writing state during rotation of the screen. A typical case is shown in Listing no. 11. Here, we see the code that is repeated on every screen, but the only thing we want is to restore the fields after the screen has rotated.
public class SampleNormalInstanceStateFragment extends Fragment {

	private static final String INT_KEY = "intKey";
	private static final String PARCELABLE_KEY = "parcelableKey";
	private static final String STRINGS_KEY = "stringsKey";

	private int sampleInt;
	private SampleNormalParcelableModel sampleParcelable;
	private ArrayList sampleStrings;

	@Override
	public void onCreate(Bundle savedInstanceState) {
		super.onCreate(savedInstanceState);
		if (savedInstanceState != null) {
			sampleInt = savedInstanceState.getInt(INT_KEY);
			sampleParcelable = savedInstanceState.getParcelable(PARCELABLE_KEY);
			sampleStrings = savedInstanceState.getStringArrayList(STRINGS_KEY);
		}
	}

	@Override
	public void onSaveInstanceState(Bundle outState) {
		super.onSaveInstanceState(outState);
		outState.putInt(INT_KEY, sampleInt);
		outState.putParcelable(PARCELABLE_KEY, sampleParcelable);
		outState.putStringArrayList(STRINGS_KEY, sampleStrings);
	}
}
Listing no. 11
Removing all code responsible for reading and writing results in much more readable class. With aforementioned library the only thing that we must add are annotations to individual fields and after that their values will be passed between the rotations of the screen. An example of such code is shown in Listing no. 12.
public class SampleLibsInstanceStateFragment extends Fragment {

	@InstanceState
	private int sampleInt;
	@InstanceState
	private SampleLibsParcelableModel sampleParcelable;
	@InstanceState
	private ArrayList sampleStrings;
}
Listing no. 12
It is important to understand that this library is based on code generation. Due to that Android Studio needs a plugin, which allows to understand what code will be generated at compile time.
Event Bus
Another mechanism worth knowing is the event bus. It allows to easily communicate with many interested parties about certain events. In this context an event can be anything from mouse click through battery level change to arrival of data downloaded from the Internet or anything else for that matter.
There are several implementations of this mechanism written in the Java language but most of them are unusable due to the specific lifetime of Android’s activities and fragments.
Otto, library described here is an improved version of the event bus known from Guava library.
Main element of the mechanism is the Bus (com.squareup.otto.Bus) class. Each instance represents separate bus, meaning that information posted to one instance will not be received on the other. This behaviour in case of a bit more complex application shows a direct need for a dependency injection, otherwise it will result in a messy code.
Communication over the bus requires posting and subscribing to the events. Events are objects of any (not primitive)type. Worth mentioning is the fact that when subscribing to the events we subscribe to all events of a given class.
Posting to the bus is done via the post() method, which accepts event object as a parameter. Exemplary post operation is shown in Listing no. 13; event used in this sample is shown in Listing no. 14. It is a simple, immutable class that contains one text field.
bus.post(new SampleBusEvent(text));
Listing no. 13
public class SampleBusEvent {

	private final String text;

	public SampleBusEvent(String text) {
		this.text = text;
	}

	public String getText() {
		return text;
	}
}
Listing no. 14
In order to receive messages sent over the bus one needs to register to it first. In case of an activity or a fragment, registration should be done in the onResume() method. To prevent memory leaks (bus often, but not always has a lifespan of an application) we need to unregister from it, this should be done in method matching place of registration in described case – onPause().
Besides registering object to interact with the bus we need to define which events we want to listen for. This is achieved by annotating method with one parameter(matching the event that we are interested in) with @Subscribe(com.squareup.otto.Subscribe) annotation as shown in Listing no. 15.
@Subscribe
public void onEventReceived(SampleBusEvent event) {
	text.setText("Event received - clicked item:\t" + event.getText());
}

@Override
public void onResume() {
	super.onResume();
	bus.register(this);
}

@Override
public void onPause() {
	super.onPause();
	bus.unregister(this);
}
Listing no. 15
Because event producers and subscribers do not need to know about each other, event bus allows to greatly simplify dependencies between different parts of the application.
Working with images
Downloading images from the Internet is a frequent operation in the mobile world, simultaneously it is one of the harder ones to be done efficiently.
Downloading
The simplest, most naive way of loading images from the Internet is a use of AsyncTask subclass.
This approach unfortunately exposes us to all AsyncTask related errors, including memory leaks, downloading outdated or already not needed data etc. Simple implementation of such task is visible in the Listing no. 16.
public class ImageTask extends AsyncTask<Void, Void, Bitmap> {

	private final String imageUrl;
	private final ImageView imageView;

	public ImageTask(String imageUrl, ImageView imageView){
		this.imageUrl = imageUrl;
		this.imageView = imageView;
	}

	@Override
	protected Bitmap doInBackground(Void... params) {
		try {
			URL url = new URL(imageUrl);
			HttpURLConnection conn = (HttpURLConnection) url.openConnection();
			conn.setRequestMethod("GET");
			conn.connect();
			return BitmapFactory.decodeStream(conn.getInputStream());
		} catch (IOException ignored){
			Log.d("ASDA",imageUrl+"  " + ignored.getMessage(), ignored);
		}
		return null;
	}

	@Override
	protected void onPostExecute(Bitmap bitmap) {
		super.onPostExecute(bitmap);
		imageView.setImageBitmap(bitmap);
	}
}

// i wywołanie
new ImageTask(item, vh.image).execute();
Listing no. 16
In such case Picasso library comes in very handy. Delivering the same functionality in just one line instead of forty, without added complexity of AsyncTask subclass and with no extra code to be maintained! Moreover, it provides a solution to the problem of downloading expired data by cancelling previous requests to the same ImageView. Equivalent invocation of Picasso library is shown in the Listing no. 17.
Picasso.with(context).load(item).into(viewHolder.image);
Listing no. 17
Internally, Picasso uses OkHttp library(also created by Square) to execute network communication. On startup it creates a thread pool of three threads to carry out requested operations. Library has the ability to respond to changing environment by changing size of the threadpool as the device comes into the WiFi, 4G or 3G coverage to optimize the use of a given medium.
Cache
By default, all downloaded data is cached, allowing to save both bandwidth and battery life in case of requesting the same files multiple times.
Cache is based on devices memory, which directly translates into the lowest access times possible. Its default implementation uses Least Recently Used(LRU) algorithm to choose objects to be removed.
At the same time library allows to supply custom implementation of cache mechanism. In order to do that we need to implement Cache interface(com.squareup.picasso.Cache).
Having prepared the custom implementation we need to instantiate object of class Picasso using the provided builder. Such operation is shown in the Listing no. 18.
new Picasso.Builder(context).memoryCache(yourCacheImplementation).build();
Listing no. 18
From now on to use custom implementation of cache one needs to inject or pass previously constructed Picasso object!
Image transformations
Picasso allows to perform complex operations on images, however out-of-the-box only basic ones are provided. Resizing and rotation operations(these are the ones available by default) are accessible via methods with the same names, in fluent api style (see Listing no. 19).
Picasso.with(this).load(R.drawable.picture3).resize(400, 400).rotate(180).into(imageView);
Listing no. 19
More complex operation need to be done via Transformation (com.squareup.picasso.Transformation) interface. Exemplary implementation that rotates and skews the image is shown in Listing no. 20.
Picasso.with(this).load(R.drawable.picture3).transform(new RotateSkewTransformation()).into(imageView);

    private class RotateSkewTransformation implements Transformation {

        @Override
        public Bitmap transform(Bitmap source) {
            Matrix mat = new Matrix();
            mat.postRotate(90);
            mat.postSkew(0.3f, 0.3f);
            Bitmap bMapRotate = Bitmap.createBitmap(source, 0, 0, source.getWidth(), source.getHeight(), mat, true);
            return bMapRotate;
        }

        @Override
        public String key() {
            return "RotateSkewTransformation_90_0.3";
        }
    }
Listing no. 20
Key() function must return unique key for transformation including its parameters(it is used for caching purposes).
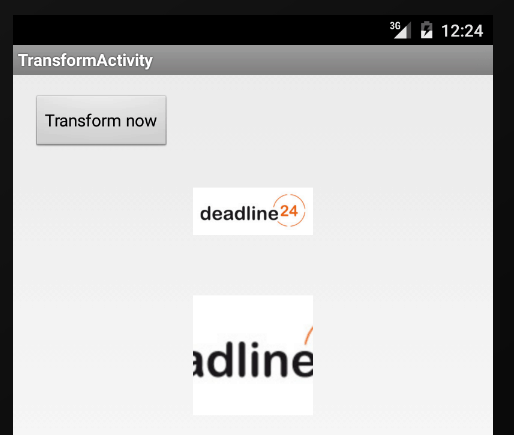
By default, loaded images obey limitations set to views in the layout (wrap_content, match_parent). However, after resizing the image, the library allows to choose whether the image should be centered and then cropped or maybe centered inside (and scaled up or down to match at least one dimension and not exceed the other, example in Listing no. 21)
Picasso.with(this).load(R.drawable.picture3).resize(imageView.getWidth
(), imageView.getHeight()).centerInside().into(imageView);

Picasso.with(this).load(R.drawable.picture3).resize(imageView2.getWidt
h(), imageView2.getHeight()).centerCrop().into(imageView2);
Listing no. 21
The effect of code from Listing no. 21 is visible in the Image no. 1. Upper view contains image with centerInside() operation, lower one with centerCrop().
To be continued…