
Hyperledger Fabric Multi-Host Sample Network Setup (no container orchestration)
- Processes, standards and quality
- Technologies
- Others
Introduction
It is always good to start with some kind of definition. Basic question: What is a blockchain? National Institute of Standards and Technology, an agency of the United States Department of Commerce, prepared a document called “Blockchain Technology Overview”. And there you can read:
Blockchains are tamper evident and tamper resistant digital ledgers implemented in a distributed fashion (i.e., without a central repository) and usually without a central authority (i.e., a bank, company, or government). At their basic level, they enable a community of users to record transactions in a shared ledger within that community, such that under normal operation of the blockchain network no transaction can be changed once published. [1]
There are many different blockchains on the market. Most people think about blockchains in context of cryptocurrencies, not realizing that there are other uses as well. Blockchain solutions can be divided into:
- Permissionless:
These solutions include Bitcoin, Litecoin, public Ethereum and other cryptocurrencies. The idea is that anyone can participate anonymously. All transactions are visible to anyone because there is one shared ledger publicly visible, without special restrictions.
- Permissioned:
Hyperledger Fabric, Besu, Go-Quorum are a few representatives of permissioned blockchain solutions. Each of them implements privacy in their own way, but in general the idea is the same:
A permissioned blockchain provides a way to secure the interactions among a group of known entities that share a mutual business goal but don’t fully trust each other, such as businesses that exchange funds, goods (supply chain), or information. The entities in permissioned blockchains can choose to make their ledgers public (viewable by anyone) or private (scoped to participants in the permissioned blockchain). [2]
Without going into details, Hyperledger Fabric (the hero of this article) is in some way special in comparison to other permissioned blockchain implementations. Both Besu and Go-Quorum are Ethereum-based, so they have all the pros and cons resulting from the foundation on which they stand. Ethereum gives the possibility of writing smart contracts, but it was designed with the background of ETH currency in mind, which results in all transactions costing money, even if in the private network the costs can be zeroed. Also, privacy in Besu and Go-Quorum is achieved as an additional layer above Ethereum nodes, so it was not a key concept from the beginning.
Hyperledger Fabric is a solution which was designed from scratch as an enterprise. It is not related to any cryptocurrency and has advanced mechanisms to achieve even very complicated business scenarios that demand privacy. The most important difference between Hyperledger Fabric and other permissioned blockchain implementations are policies that can be defined on different levels.
Channel configuration which is defined inside configtx.yaml file contains default policies. These polices can be overwritten in channel config. There is also a possibility to create your own policies and use them in different places. Policies defined within channel configuration can also be overridden on lower levels, like chaincode, or private data collection definitions. They can even be overridden for specific assets (state-based endorsement). There is great flexibility in defining what can be done and by whom in the context of channels.
There is no simple answer to which permissioned blockchain implementation is better. You need to know what you have to do, you need to know different blockchains and fit everything together. For instance, Hyperledger Fabric is great, has many configuration possibilities, but is very complex and has a high entry barrier. Often the use of “simpler” blockchains can be sufficient in smaller projects.
But the article is not about this. It was just a few words for everyone ?. The assumption here is, that you have already decided that you want to setup the Hyperledger Fabric network, because it is good for your project and you have the nerves of steel.
The article describes one of the possible ways to achieve the Multi-Host Network setup. The goal is to check if there is an option to decentralize network components (as peer and orderer organisations) between different hosts located in mixed environment. Mixed environment means here: using cloud resources and on-premise virtual machines. You can choose your preferred cloud provider, but in the described scenario Microsoft Azure is used. For better understanding of basics and not adding more complexity to the already complex topic, no container orchestrator is used.
Let’s begin!
Network architecture
The proposed architecture may make no sense for you, but it is just for “proof of concept” purposes. Components are distributed between 3 virtual machines to test communication. In a real case scenario, when you are building some kind of consortium, there should be more nodes to host similar network structure. Components like peers and orderers belonging to a given organization should be placed on machines which the organization controls.
It is worth mentioning, that the described configuration does not contain the system channel, just the application channel:
System channel has been in Fabric since its launch. It is used by orderers to keep the consortium configuration. In a typical setup, we first bring up the system channel (with orderer genesis block file) in the orderers. After that, we can generate the channel block file through transaction updates per each application channel. Fabric v2.3 supports a setup with no system channel required. We can generate the genesis block file for the channel directly, and let both orderers and peers join with it. [3]
Such an approach increases privacy, provides better scalability and is simpler to manage. In the sample network described below there is one organization that has 3 orderers but the configuration remains open.
Sample network contains 4 organizations:
- Order – only orderers.
- System – consortium organization, includes 1 peer.
- Core1 – represents second consortium organization, includes 2 peers.
- Core2 – represents third consortium organization, includes 1 peer.
There are 3 virtual machines to host all network components:
- On-premise: VM1, VM2
- Microsoft Azure: VM3
Each virtual machine contains components listed below:
- VM1
- Certificate Authorities:
- ca-tls – certs for network components,
- rca-order – certs for Order organization,
- rca-system – certs for System organization,
- rca-core1 – certs for Core1 organization,
- rca-core2 – certs for Core2 organization.
- Orderers:
- orderer1-order
- Peers:
- peer2-core1
- peer1-system
- Certificate Authorities:
- VM2
- Orderers:
- orderer2-order
- Peers:
- peer1-core1
- Orderers:
- VM3
- Orderers:
- orderer3-order
- Peers:
- peer1-core2
- Orderers:
Word about Microsoft Azure + on-premises
From a further configuration steps perspective, it doesn’t matter if virtual machines are placed on cloud or in local company network. There is a need to establish a connection between on-premises network and Microsoft Azure virtual network, so all virtual machines can ping mutually. It can be done in many ways depending on your on-premises setup. There are some things that can impact the final solution, like i.e. external IP or firewalls. For more about this topic, you should follow documentation and choose the best option that will fit your needs and potential costs. In described case VPN Gateway has been used.
You may imagine scenario where some of consortium members already have own on-premises infrastructure and they don’t want to bear unnecessary, additional costs of cloud.
Before configuration
It must be clearly stated. This is not a step by step guide, but rather an explanation of the steps and processes that, put together, lead to a specific goal. Without such a premise the article would be three times as long, as it is.
Other premises:
- Docker and Docker Compose understanding is necessary (there won’t be any detailed instructions).
- Fabric binaries have to be visible globally in the operating system.
- 3 virtual machines, which can communicate with each other, have to be prepared before.
The majority of the steps have to be done on the VM1, because in the described configuration all certificate authorities operate there.
Configuration files
There are some *.yaml files which are required from the Fabric point of view:
- configtx.yaml – that describes channel configuration and profiles for consortium,
- orderer.yaml – it defines default configuration for the orderer component,
- core.yaml – it defines default configuration for the peer component,
- core1-config.yaml – NodeOUs for Core1 organization,
- core2-config.yaml – NodeOUs for Core2 organization,
- system-config.yaml – NodeOUs for System organization,
- order-config.yaml – NodeOUs for Order organization.
If you are not familiar with them, please go to the Hyperledger fabric documentation and read about them. Some have different names but the file structure is pretty straightforward.
Sample configs can be seen in fabric repository: link. The most important configuration files are configtx.yaml, orderer.yaml and core.yaml. The last 2 files shouldn’t be modified. There is the need to override some of the values inside of them, but it can be done by creating proper environmental variables at service definition level for docker-compose.
As it was mentioned before, configtx.yaml contains network channel configuration. There are organizations defined that should belong to the channel with their component structures (anchor peers, orderers) and policies. It is good to analyze sample config, as it contains many helpful comments.
The profile of our sample network channel configuration is defined as follows:
Profiles:
SampleAppChannelEtcdRaft:
<<: *ChannelDefaults
Orderer:
<<: *OrdererDefaults
Organizations:
- *order
Capabilities:
<<: *OrdererCapabilities
Application:
<<: *ApplicationDefaults
Organizations:
- *system
- *core1
- *core2
Capabilities:
<<: *ApplicationCapabilities
The diagram below presents the structure of policies with their definitions for our sample network, which is different than the configuration from the previous link (core2 organization has been removed from the diagram to increase readability, it is similar to the others):
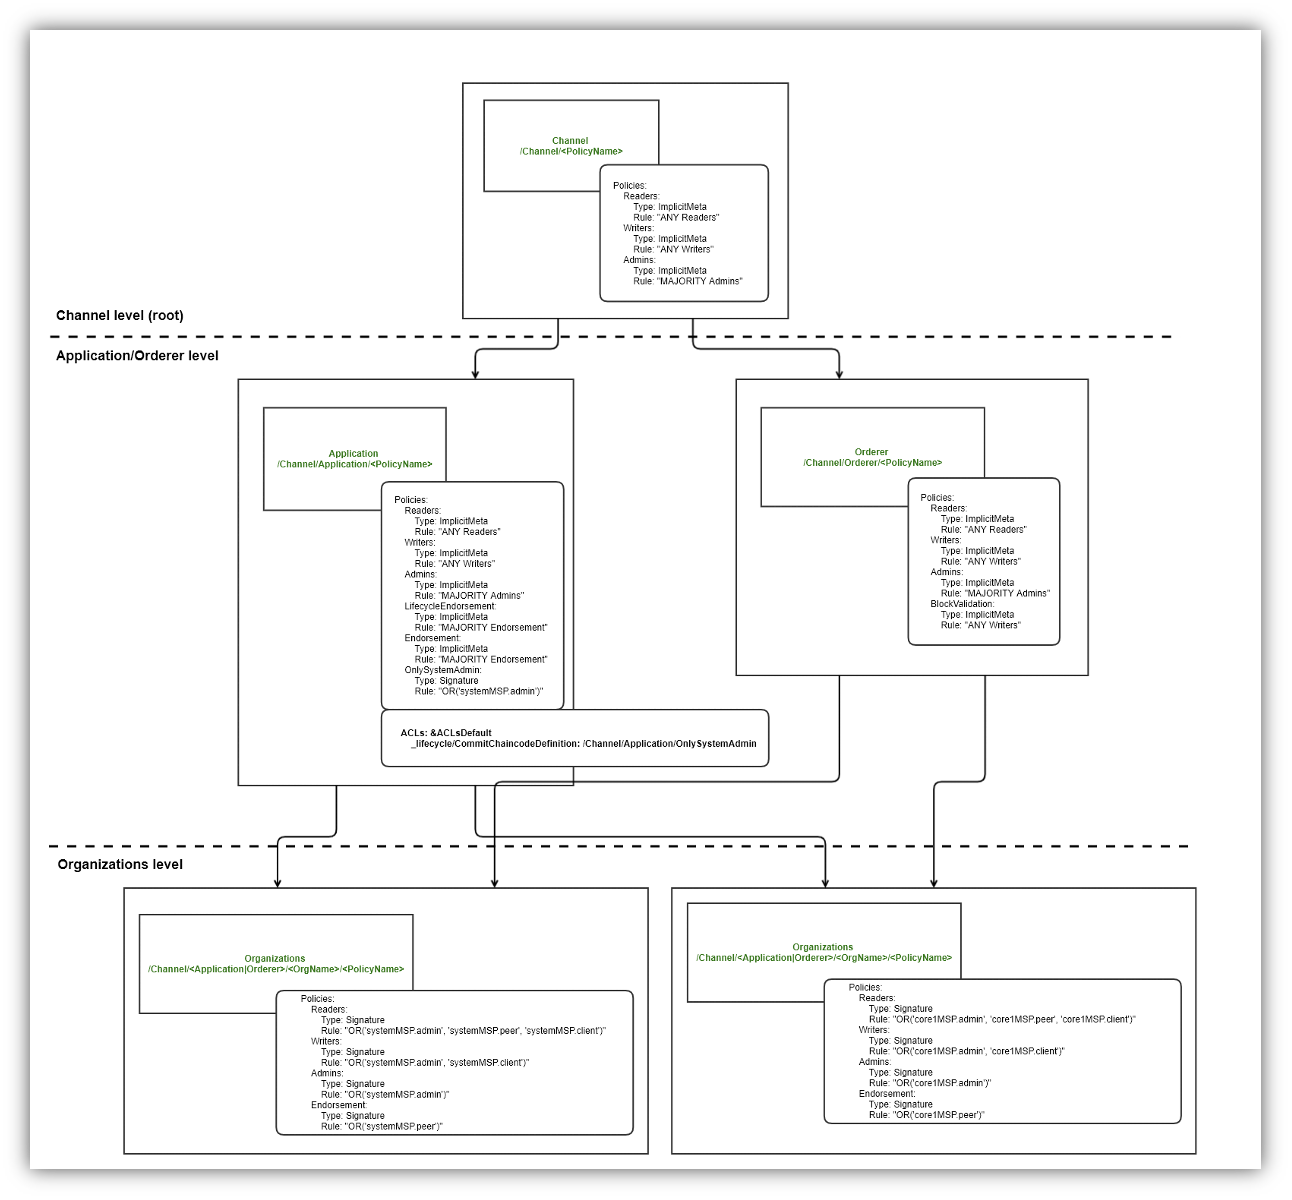
The rest of configs, whose names end with “*-config.yaml” are based on the sample config presented here: link.
Configuration steps
- Generate crypto material.
In the first step you need to run the properly configured certificate authorities’ containers. Look below at “ca-tls” service definition (the rest of ca service definitions look similar):
version: '3.7'
networks:
multi-host-net:
services:
ca-tls:
container_name: ca-tls
image: hyperledger/fabric-ca:<FABRIC_CA_VERSION>
command: sh -c 'fabric-ca-server start -d -b tls-ca-admin:<CA_TLS_ADMIN_PASS> --port 7052'
environment:
- FABRIC_CA_SERVER_HOME=<FABRIC_CA_SERVER_HOME>
- FABRIC_CA_SERVER_TLS_ENABLED=true
- FABRIC_CA_SERVER_CSR_CN=tls-ca
- FABRIC_CA_SERVER_CSR_HOSTS=<VM1_IP>
- FABRIC_CA_SERVER_DEBUG=true
volumes:
- <WORKING_DIR>/tls-ca:<CONTAINER_VOLUME>
networks:
- multi-host-net
ports:
- <VM1_IP>:7052:7052
All listings posted in this article contain different variables as <FABRIC_CA_VERSION>. They should be replaced with desired values (or your own named variables). Remember to pass the same values whenever necessary.
Now you can run all certificate authorities using the command:
docker-compose -f ./docker-compose-ca.yaml up -d ca-tls rca-system rca-order rca-core1 rca-core2The file passed to the command above contains all service definitions (ca-tls, rca-system, etc.) listed on the right-hand side.
Next you need to register all components as “ca-tls” administrator. Admin has been created during the CA container launch. Look at the command section of “ca-tls” service definition.
You need to set some environment variables used by CA:
export FABRIC_CA_CLIENT_TLS_CERTFILES=<WORKING_DIR>/tls-ca/crypto/tls-cert.pem
export FABRIC_CA_CLIENT_HOME=<WORKING_DIR>/tls-ca/admin
export PARENT_CA_FABRIC_SERVER=https://<VM1_IP>:<CA_TLS_PORT>
Then enroll the admin:
fabric-ca-client enroll -d -u https://tls-ca-admin:<CA_TLS_ADMIN_PASS>@<VM1_IP>:<CA_TLS_PORT>And register all network components (a few examples below):
fabric-ca-client register -d --id.name peer1-core1 --id.secret <PEER1_CORE1_PASS> --id.type peer -u $PARENT_CA_FABRIC_SERVER
fabric-ca-client register -d --id.name orderer1-order --id.secret <ORDERER1_PASS> --id.type orderer -u $PARENT_CA_FABRIC_SERVER
fabric-ca-client register -d --id.name admin-orderer1-order --id.secret <ORDERER1_ADMIN_PASS> --id.type admin -u $PARENT_CA_FABRIC_SERVER
Additional admins for orderers (admin-orderer1-order, admin-orderer2-order, etc.) must be created because they are necessary to join orderers in a channel later.
After network components registration is done, you need to register the rest of identities, for all organizations one by one. As an example, “rca-system” is used:
export FABRIC_CA_CLIENT_TLS_CERTFILES=<WORKING_DIR>/system/ca/crypto/ca-cert.pem
export FABRIC_CA_CLIENT_HOME=<WORKING_DIR>/system/ca/admin
export PARENT_CA_FABRIC_SERVER=https://<VM1_IP>:<RCA_SYSTEM_PORT>

fabric-ca-client enroll -d -u https://rca-system-admin:<RCA_SYSTEM_ADMIN_PASS>@<VM1_IP>:<RCA_SYSTEM_PORT>

fabric-ca-client register -d --id.name admin-system --id.secret <ADMIN_SYSTEM_PASS> --id.type admin -u $PARENT_CA_FABRIC_SERVER

fabric-ca-client register -d --id.name peer1-system --id.secret <PEER1_SYSTEM_PASS> --id.type peer -u $PARENT_CA_FABRIC_SERVER
Registered identities must be enrolled to generate necessary certificates. So, the next step is to enroll peer1 for System, admin for System, orderer1 for Order, etc. As an example the System organization is used again.
export FABRIC_CA_CLIENT_HOME=<WORKING_DIR>/system/peer1
export FABRIC_CA_CLIENT_TLS_CERTFILES=<WORKING_DIR>/system/peer1/assets/ca/system-ca-cert.pem
export FABRIC_CA_CLIENT_MSPDIR=msp

fabric-ca-client enroll -d -u https://peer1-system:<PEER1_SYSTEM_PASS>@<VM1_IP>:<RCA_SYSTEM_PORT>

export FABRIC_CA_CLIENT_MSPDIR=tls-msp
export FABRIC_CA_CLIENT_TLS_CERTFILES=<WORKING_DIR>/system/peer1/assets/tls-ca/tls-ca-cert.pem

fabric-ca-client enroll -d -u https://peer1-system:<PEER1_SYSTEM_PASS>@<VM1_IP>:<CA_TLS_PORT> --enrollment.profile tls --csr.hosts peer1-system --csr.hosts localhost

export FABRIC_CA_CLIENT_HOME=<WORKING_DIR>/system/admin
export FABRIC_CA_CLIENT_TLS_CERTFILES=<WORKING_DIR>/system/peer1/assets/ca/system-ca-cert.pem
export FABRIC_CA_CLIENT_MSPDIR=msp

fabric-ca-client enroll -d -u https://admin-system:<ADMIN_SYSTEM_PASS>@<VM1_IP>:<RCA_SYSTEM_PORT>
After you handle all registrations and enrollments, you should have all necessary crypto material generated. Certificates should be copied from VM1 to VM2 and VM3. There is no need to copy everything everywhere. You have to make sure that all crypto material related to network components that will run on specific virtual machines is there.
2. Prepare orderers.
Below you can see orderer1-order service definition, which can be used as a template to create orderer2-order and orderer3-order. As you can see, there are many environment variables set, e.g. paths to certificates generated in the previous step. Details can be found in Fabric documentation.
From the perspective of this article, the most important sections are ports and extra_hosts. Containers should have specific ports exposed. In this case an option with host IP address binding is used.
You should be careful during allocation of ports to the other orderers and (later) peers, to avoid port conflicts. Containers should be exposed on different ports to avoid problems. In the described solution the following approach was taken: the port value is increased always, despite the fact that orderers or peers are on different virtual machines, but don’t have to be. Such an approach is more resilient. Examples:
- orderer1-order has exposed port 7050, then orderer2-order may have 8050, etc.
- peer1-system has exposed port 7051, then next peers may have 8051, 9051, etc.
In extra_hosts section it’s necessary to provide the list of host name mappings. Each container should include all peers and orderers, but itself. It is very important to carefully prepare such lists for all network components to achieve proper communication between them.
Mappings defined in extra_hosts sections cause the addition of corresponding /etc/hosts entries inside containers.
version: '3.7'
networks:
multi-host-net:
services:
orderer1-order:
container_name: orderer1-order
image: hyperledger/fabric-orderer:<FABRIC_VERSION>
environment:
- ORDERER_HOME=/tmp/hyperledger/orderer
- ORDERER_HOST=orderer1-order
- ORDERER_GENERAL_LISTENADDRESS=0.0.0.0
- ORDERER_GENERAL_BOOTSTRAPMETHOD=none
- ORDERER_CHANNELPARTICIPATION_ENABLED=true
- ORDERER_GENERAL_LOCALMSPID=orderMSP
- ORDERER_GENERAL_LOCALMSPDIR=/tmp/hyperledger/order/orderer/msp
- ORDERER_GENERAL_TLS_ENABLED=true
- ORDERER_GENERAL_TLS_CERTIFICATE=/tmp/hyperledger/order/orderer/tls-msp/signcerts/cert.pem
- ORDERER_GENERAL_TLS_PRIVATEKEY=/tmp/hyperledger/order/orderer/tls-msp/keystore/key.pem
- ORDERER_GENERAL_TLS_ROOTCAS=[/tmp/hyperledger/order/orderer/tls-msp/tlscacerts/<CA_TLS_CERT_NAME_PREFIXED>]
- ORDERER_GENERAL_LOGLEVEL=debug
- ORDERER_DEBUG_BROADCASTTRACEDIR=data/logs
- FABRIC_LOGGING_SPEC=info
- ORDERER_ADMIN_LISTENADDRESS=0.0.0.0:7080
- ORDERER_ADMIN_TLS_ENABLED=true
- ORDERER_ADMIN_TLS_PRIVATEKEY=/tmp/hyperledger/order/orderer/tls-msp/keystore/key.pem
- ORDERER_ADMIN_TLS_CERTIFICATE=/tmp/hyperledger/order/orderer/tls-msp/signcerts/cert.pem
- ORDERER_ADMIN_TLS_CLIENTAUTHREQUIRED=true
- ORDERER_ADMIN_TLS_CLIENTROOTCAS=[/tmp/hyperledger/order/orderer/tls-msp/tlscacerts/<CA_TLS_CERT_NAME_PREFIXED>]
volumes:
- <WORKING_DIR>/order/orderer1:/tmp/hyperledger/order/orderer/
- <WORKING_DIR>/order/admin:/tmp/hyperledger/order/admin/
ports:
- <VM1_IP>:7050:7050
- <VM1_IP>:7080:7080
networks:
- multi-host-net
extra_hosts:
- "orderer3-order:<VM3_IP>"
- "orderer2-order:<VM2_IP>"
- "peer1-core1:<VM2_IP>"
- "peer2-core1:<VM1_IP>"
- "peer1-core2:<VM3_IP>"
- "peer1-system:<VM3_IP>"
{…}
The variable <CA_TLS_CERT_NAME_PREFIXED>] is an autogenerated cert file name, that consists of an IP address and port. It may look like this: “tls-10-57-13-180-7052.pem”
3. Prepare peers.
The same story with the peers. Below you can see peer1-system service definition which can also be used as an entry point to prepare the rest of peer service definitions.
version: '3.7'
networks:
multi-host-net:
services:
peer1-system:
container_name: peer1-system
image: hyperledger/fabric-peer:<FABRIC_VERSION>
environment:
- CORE_PEER_ID=peer1-system
- CORE_PEER_ADDRESS=peer1-system:7051
- CORE_PEER_LOCALMSPID=systemMSP
- CORE_PEER_LISTENADDRESS=0.0.0.0:7051
- CORE_PEER_MSPCONFIGPATH=/tmp/hyperledger/system/peer1/msp
- CORE_VM_ENDPOINT=unix:///host/var/run/docker.sock
- CORE_VM_DOCKER_HOSTCONFIG_NETWORKMODE=<COMPOSE_PROJECT_NAME>_poc-net
- CORE_PEER_TLS_ENABLED=true
- CORE_PEER_TLS_CERT_FILE=/tmp/hyperledger/system/peer1/tls-msp/signcerts/cert.pem
- CORE_PEER_TLS_KEY_FILE=/tmp/hyperledger/system/peer1/tls-msp/keystore/key.pem
- CORE_PEER_TLS_ROOTCERT_FILE=/tmp/hyperledger/system/peer1/tls-msp/tlscacerts/<CA_TLS_CERT_NAME_PREFIXED>
- CORE_PEER_GOSSIP_USELEADERELECTION=false
- CORE_PEER_GOSSIP_ORGLEADER=true
- CORE_PEER_GOSSIP_EXTERNALENDPOINT=peer1-system:7051
- CORE_PEER_GOSSIP_SKIPHANDSHAKE=true
working_dir: /opt/gopath/src/github.com/hyperledger/fabric/system/peer1
volumes:
- /var/run:/host/var/run
- <WORKING_DIR>/system/peer1:/tmp/hyperledger/system/peer1
- <WORKING_DIR>/system/admin:/tmp/hyperledger/system/admin
ports:
- <VM1_IP>:7051:7051
networks:
- multi-host-net
extra_hosts:
- "peer1-core1:<VM2_IP>"
- "peer2-core1:<VM1_IP>"
- "peer1-core2:<VM3_IP>"
- "orderer1-order:<VM1_IP>"
- "orderer2-order:<VM2_IP>"
- "orderer3-order:<VM3_IP>"
{…}
4. Prepare CLIs.
The Hyperledger Fabric CLI (command line interface) is a special tool that can be used to interact with the Fabric network. From a practical point of view, Fabric CLI is another docker container. For instance, it can be configured to talk with a specific Fabric network component (peer, orderer) as a specific user which is defined through environment variable (e.g. organization administrator). Other necessary variables can also be provided. Such a CLI container has reference to Fabric binaries. In the case described in this article, there is one additional CLI container per network component. Below there are 2 sample CLI service definitions:
- cli-system – interaction with peer1-system,
- cli-orderer1 – interaction with orderer1-order.
version: '3.7'
networks:
    multi-host-net:
services:
  cli-system:
    container_name: cli-system
    image: hyperledger/fabric-tools:<FABRIC_VERSION>
    tty: true
    stdin_open: true
    environment:
      - GOPATH=/opt/gopath
      - CORE_PEER_ID=cli
      - CORE_PEER_ADDRESS=peer1-system:7051
      - CORE_PEER_LOCALMSPID=systemMSP
      - CORE_PEER_TLS_ENABLED=true
      - CORE_PEER_TLS_ROOTCERT_FILE=/tmp/hyperledger/system/peer1/tls-msp/tlscacerts/<CA_TLS_CERT_NAME_PREFIXED>
      - CORE_PEER_MSPCONFIGPATH=/tmp/hyperledger/system/admin/msp
    working_dir: /opt/gopath/src/github.com/hyperledger/fabric/system
    command: sh
    volumes:
      - <WORKING_DIR>/system/peer1:/tmp/hyperledger/system/peer1
      - <WORKING_DIR>/chaincode:/opt/gopath/src/github.com/hyperledger/fabric-samples/chaincode
      - <WORKING_DIR>/system/admin:/tmp/hyperledger/system/admin
      - <WORKING_DIR>/<CHANNEL_NAME>.block:/tmp/hyperledger/<CHANNEL_NAME>.block
    networks:
      - multi-host-net
    extra_hosts:
      - "peer1-core1:<VM2_IP>"
      - "peer2-core1:<VM1_IP>"
      - "peer1-core2:<VM3_IP>"
      - "peer1-system:<VM1_IP>"
      - "orderer1-order:<VM1_IP>"
      - "orderer2-order:<VM2_IP>"
      - "orderer3-order:<VM3_IP>"
{…}

  cli-orderer1:
    container_name: cli-orderer1
    image: hyperledger/fabric-tools:<FABRIC_VERSION>
    tty: true
    stdin_open: true
    environment:
      - GOPATH=/opt/gopath
      - FABRIC_LOGGING_SPEC=INFO
    working_dir: /tmp/hyperledger/
    command: sh
    volumes:
      - <WORKING_DIR>/order/orderer1:/tmp/hyperledger/order/orderer/
      - <WORKING_DIR>/<CHANNEL_NAME>.block:/tmp/hyperledger/<CHANNEL_NAME>.block
    networks:
      - multi-host-net
{…}
5. Run all services.
So, it is time to run all containers prepared in previous steps. The first thing you need to do is to open a terminal on VM1 and execute the following commands in the directory that contains all docker-compose files:
docker-compose -f ./docker-compose-peers.yaml up -d peer1-system peer2-core1
docker-compose -f ./docker-compose-orderers.yaml up -d orderer1-order
docker-compose -f ./docker-compose-cli.yaml up -d cli-system cli-orderer1
Next, from a terminal on VM2:
docker-compose -f ./docker-compose-peers.yaml up -d peer1-core1
docker-compose -f ./docker-compose-orderers.yaml up -d orderer2-order
docker-compose -f ./docker-compose-cli.yaml up -d cli-peer1-core1 cli-orderer2
And from a terminal on VM3:
docker-compose -f ./docker-compose-peers.yaml up -d peer1-core2
docker-compose -f ./docker-compose-orderers.yaml up -d orderer3-order
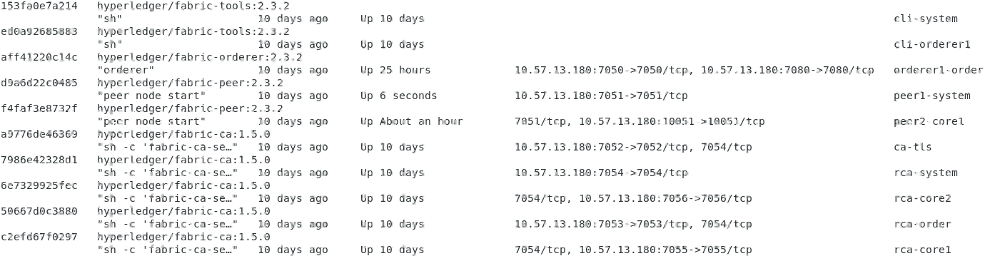
docker-compose -f ./docker-compose-cli.yaml up -d cli-peer1-core2 cli-orderer3If everything has been configured properly, all necessary network components should run. You can execute docker ps command to check running containers. Sample output from VM1 terminal below:
6. Create the first block and connect members to a channel.
All network components are working now, but they are not connected with each other yet. You have to create a channel block which is needed to connect peers and orderers to the same channel.
Again, open a terminal on VM1 and execute the command:
configtxgen -profile SampleAppChannelEtcdRaft -configPath <WORKING_DIR> -outputBlock <CHANNEL_NAME>.block -channelID <CHANNEL_NAME>The configtxgen command allows users to create and inspect channel config related artifacts. The content of the generated artifacts is dictated by the contents of configtx.yaml [4]
As you can see “SampleAppChannelEtcdRaft” profile from configtx.yaml file has been used. Config file must be present under a specific “configPath” directory. After the command execution you should see a new file with the name provided as “outputBlock” parameter. The file has to be copied to VM2 and VM3.
Go back to the terminal on VM1 and execute the commands:
docker exec -it cli-orderer1 osnadmin channel join --channelID <CHANNEL_NAME> --config-block /tmp/hyperledger/<CHANNEL_NAME>.block -o orderer1-order:7080 --ca-file /tmp/hyperledger/order/orderer/tls-msp/tlscacerts/<CA_TLS_CERT_NAME_PREFIXED> --client-cert /tmp/hyperledger/order/orderer/admin/tls-msp/signcerts/cert.pem --client-key /tmp/hyperledger/order/orderer/admin/tls-msp/keystore/key.pem
docker exec -it cli-system peer channel join -b /tmp/hyperledger/<CHANNEL_NAME>.block
You should be able to connect the rest of network components to the channel by executing these commands (after modifications) on VM2 and VM3.
The first of the commands listed above allows connecting an orderer to the channel by passing channel block file generated previously. It can be executed only by the orderer administrator (look at passed certificates). The second command is about connecting the peer to the channel. More details about the commands mentioned can be found in the documentation.
As you probably know, there are more commands. For instance you can check, after joining a channel, if everything is OK from the orderer’s or peer’s perspective:
- osnadmin channel list – it returns all orderer’s channels, example output:
{
"name": "backbonechannel",
"url": "/participation/v1/channels/backbonechannel",
"consensusRelation": "consenter",
"status": "active",
"height": 41
}- peer channel getinfo -c <CHANNEL_NAME> – it returns basic info about the peer’s channel (channel name passed after -c flag), example output:
INFO 001 Endorser and orderer connections initialized
Blockchain info: {
"height":41,"currentBlockHash":"w0FxTO3ch0Jt2YGODJ/PI7J9E1/K455vO2We9mOABIM=","previousBlockHash":"FLRqPNC8FmtIDsD8yWXgyrafhbJ4SOWvFS+BB/f/0Mc="
}
Now, you should have a working network with the channel based on your configtx.yaml file and peers and orderers communicating with each other. To make sure that everything is working as expected, you can explore orderer and peer logs, e.g. the command: docker logs orderer1-order.
The next step could be to commit and query/invoke some chain code, but this is a separate topic, not covered by this instruction.
Summary
It has been shown that it is possible to setup a multi-host Hyperledger Fabric network, even if virtual machines are scattered between the cloud and on-premise network. The key is to ensure mutual connectivity of all virtual machines. In the sample network static IP addresses have been used to configure the visibility of docker containers. It is not the best solution, but sufficient to prove some concepts. For production networks, in most cases, using a container orchestrator like Kubernetes, would be a better option.
—————
