
The truth can be measured. Is it a myth, or is blockchain performance really that bad?
- Processes, standards and quality
- Technologies
- Others
For all widely known technologies, there are some myths that usually come from a misunderstanding of technology concepts or just from how easy it is to jump to hasty conclusions.
Often people tend to share their thoughts, even if they know nothing about a topic, but they heard or read some wild and bad things from an unknown or untrusted source. So, just keep reading to form your own opinion…
And it is no different in case of blockchain technology. There are some popular myths:
- All data added to a blockchain is public – not going into details, there are concepts of private and public blockchains, as well as private and public transactions. Private transactions can be visible only for specific parties and in case of public transactions, if we use addresses in a way that can’t be connected with identity then they can be considered anonymous.
- Blockchain will replace traditional databases – as usual, we should consider whether it is appropriate to use blockchain technology for a specific case, there are even diagrams that can help you decide by answering simple questions. As developers we shouldn’t be biased by trends, buzzwords – objectivity can help us define the root problem to solve and use the most suitable technologies, frameworks and tools.
- Blockchains are costly and inefficient – in most cases it is false, but a good senior developer with a bit of blockchain knowledge would say ‘it depends’. We need to avoid generalization, that is for certain. Terms that can help you find arguments against this myth and build your own opinion, are:
– private blockchain vs public blockchain
– different consensus protocols like proof of authority, proof of stake, proof of coverage and, of course, a well-known proof of work
– Blockchain throughput measured as blockchain ability to execute a number of transactions per one second – and this is the main topic that I will try to cover in this article.
I would like to start with some metrics:
- Bitcoin ~7tps (PoW)
- Ethereum ~15tps (still PoW)
- Litecoin ~56tps (PoW)
- Cardano ~250tps (PoS)
- Binance Chain ~118tps (PoA)
- VISA ~1500-2000tps
- Azure SQL Database – depending on the tier selected and how much you are eager to pay but from a few concurrent requests to even 79000 tps.
(Values presented above were correct at least at the time of writing)
(Curious what TPS is? – keep reading or check out this link https://academy.binance.com/en/glossary/transactions-per-second-tps)
But also, I would like to debunk another myth. There is a belief that we can do anything with relational databases. And here comes Microsoft recommendation (found in the documentation) concerning the use of Cosmos DB – “if your transactional volumes are reaching extreme levels, such as many thousands of transactions per second, you should consider a distributed NoSQL database”. This shows that we should always take into account a business case and the potential of technology, and we should not be biased by general rules or beliefs.
As you can see there is no quick and easy reasoning, since performance is driven by multiple factors such as: hardware setup, pricing tier in terms of cloud services, architecture – centralized or distributed, data processing, consensus mechanism to mutually agree on what the current state is, block size, during testing the type of transaction might be a game-changer, and still it’s not a complete list…
As we talk about blockchain I would like to focus on enterprise blockchain. Is it worth consideration or it is pointless? I would also like to warn you that you won’t find an accurate answer in this article, as I’m focused on delivering you the right tools and extensive knowledge to prevent misconception.
Through the rest of the article I will refer to the projects that are a part of the Hyperledger umbrella, and these are Hyperledger Fabric, Hyperledger Besu (two blockchains) and the performance measuring tool, Hyperledger Caliper.
Here is a bit of background for the two blockchains that will be tested:
- Fabric – designed from scratch as an enterprise blockchain with all the concepts that support commercial transactions. Has no twins in the space of public blockchain.
- Besu – design based on Ethereum blockchain, a plug-in consensus mechanism, added features of transaction privacy.
These two are also the most popular blockchains, if we consider enterprise use.
I tried to make the test conditions comparable for both blockchains, so the test environment was setup on three hosts, two available locally and one hosted in the Microsoft Azure Cloud in the North Europe region. Transactions that were used for testing consisted in changing the state in the smart contract and reading separately. Also, I didn’t perform any specific changes to the out-of-the-box configuration, as possibilities are wide and almost endless, and, in addition, it should be adapted to a specific business case. In your case it can be a locally run blockchain.
When we are ready with blockchain environments as systems under tests (SUT, or just tested objects) we can swiftly move to the Hyperledger Caliper. This tool is open-sourced, as well as the above mentioned blockchains. Hyperledger Caliper supports a few blockchain platforms, but it is possible to extend it by writing your own connector for specific blockchain purpose. Documentation is well written, especially for Fabric, which is still the biggest and probably one of the most popular platforms thanks to IBM. There are two ways of working with Caliper: it can be installed locally, but can also be used as a docker container, which is more immune to local dependencies. As an execution result, it generates an HTML file with performance metrics like:
- Transaction/read throughput (TPS),
- Transaction/read latency (min, max, avg),
- Resource Consumption (CPU, Memory).
Two words about how it looks like under the hood. The Hyperledger Caliper consists of:
- workload module,
- benchmark configuration,
- network configuration,
- benchmark artifacts,
- execution module.
The first three components are the main part that we can work on, being able to setup a valid connection to the blockchain, ensuring that we deliver artifacts like addresses and contracts up to a declarative way of describing how the test should look like and which approach should be used. I have mentioned execution module – this part consists of two kinds of services: a manager and workers. As you can imagine, manager coordinates the whole process, gathers results, and generates benchmark report, while workers generate the actual workload, independently of each other. I won’t go deeper into the ‘dark side’ of the tool architecture, but if you are interested, do not hesitate to visit their documentation: https://hyperledger.github.io/caliper/v0.4.2/architecture/
Necessary configuration:
Let’s start with benchmarks for Hyperledger Besu. Benchmarks use a declarative way for test definition, the naming convention is straightforward and direct. The rounds section is an array, so you can specify as many rounds as you would like to. I decided to keep it simple and clean so ‘reading’ and ‘writing’ tests are separated (different files), but for your purpose you can just copy everything that appears after ‘rounds’ and change some parameters, then paste it at the end of the selected file. For instance, you can increase the TPS number or change approach. But remember about proper indentation in files.
#/benchmarks/besu/read.yaml
test:
  name: Simple Storage Besu contract - GET
  description: A test benchmark of reading
  workers:
    type: local
    number: 5
  rounds:
    - label: Fixed Rate 100
      description: Simple Storage Besu benchmark
      txDuration: 20
      rateControl:
        type: fixed-rate
        opts:
          tps: 100
      workload:
        module: workload/besu/simpleStorageWorkload.js
        contracts: simpleStorage
#/benchmarks/besu/submit.yaml
test:
  name: Simple Storage Besu contract - SET
  description: A test benchmark of writing
  workers:
    type: local
    number: 5
  rounds:
    - label: Fixed Rate 100
      description: Simple Storage Besu benchmark
      txDuration: 20
      rateControl:
        type: fixed-rate
        opts:
          tps: 100
      workload:
        module: workload/besu/submitStorageWorkload.js
        contracts: simpleStorage
Benchmarks for Fabric look similarly, with a slight difference in workload definition because of different file that is referenced, and additional argument passed as a value to the workload execution module. All benchmarks in this article use simple approach, where specific load is used every second (value for tps). At the end of the file smart contract is mentioned, but will be presented later.
#/benchmarks/fabric/read.yaml
test:
  name: Simple Storage Fabric contract - GET
  description: A test benchmark of reading
  workers:
    type: local
    number: 5
  rounds:
    - label: Fixed Rate 100
      description: Simple Storage Fabric benchmark
      txDuration: 20
      rateControl:
        type: fixed-rate
        opts:
          tps: 100
      workload:
        module: workload/fabric/readSimpleStorageContract.js
        arguments:
          contractId: SimpleStorage
#/benchmarks/fabric/submit.yaml
test:
name: Simple Storage Fabric contract - SET
description: A test benchmark of writing
workers:
type: local
number: 5
rounds:
- label: Fixed Rate 10
description: Simple Storage Fabric benchmark
txDuration: 20
rateControl:
type: fixed-rate
opts:
tps: 10
workload:
module: workload/fabric/submitSimpleStorageContract.js
arguments:
contracts: SimpleStorageWorkloads that are mentioned as a module value in benchmarks are as shown below. The First one is for ‘reading’ and the second one is performing a physical transaction. You may want to use this code, so it is necessary to install the npm package called ethereumjs-wallet (npm install ethereumjs-wallet@0.6.5). We are using version 0.6.5 – the syntax of other versions can be different. There is also web3 installed in version 1.2.0. Workloads have 3 main parts:
- initializeWorkloadModule – all the setups should happen here. It is important that this method is executed for each worker separately, so tests should be designed appropriately. In my example, I just make sure that the used address will have enough funds for transactions. I also decided to move the transfer of funds outside of this file and it is done by prefundAddresses.js.
- submitTransaction – this part is responsible for the workload and repeated as many times as necessary during the execution.
- cleanupWorkloadModule – clean up after the test
//simpleStorageWorkload.js
'use strict';

const { WorkloadModuleBase } = require('@hyperledger/caliper-core');
const EthereumHDKey = require('ethereumjs-wallet/hdkey');
const Web3 = require('web3');
var _totalWorkers = 0;

const privKey = "<your private key>"
const preFundedAccount = '<address associated with privKey>';
const wsAddr = "ws://192.168.1.1:8547"
const masterSeed = "<your seed for deterministic wallet>"

function getRandomInt(min, max) {
    min = Math.ceil(min);
    max = Math.floor(max);
    return Math.floor(Math.random() * (max - min)) + min;
  }

class MyWorkload extends WorkloadModuleBase {
    constructor() {
        super();
        this.web3 = new Web3(wsAddr);
        this.web3.eth.accounts.wallet.add(privKey);
    }

    async initializeWorkloadModule(workerIndex, totalWorkers, roundIndex, roundArguments, sutAdapter, sutContext) {
        await super.initializeWorkloadModule(workerIndex, totalWorkers, roundIndex, roundArguments, sutAdapter, sutContext);

        let hdwallet = EthereumHDKey.fromMasterSeed(masterSeed);
        let wallet = hdwallet.derivePath('m/44\'/60\'/' + workerIndex + '\'/0/0').getWallet();
        let producedAddress = wallet.getChecksumAddressString();
        console.log(`ADDRESS FROM SEED for index ${workerIndex} ->  ${producedAddress}`)
        this.web3.eth.accounts.wallet.add(wallet.getPrivateKeyString());

        let balance = await this.web3.eth.getBalance(producedAddress);
        console.log(`${producedAddress} balance ${this.web3.utils.fromWei(balance, 'ether')} ETH`);
        if(balance < this.web3.utils.toWei('0.1', 'ether')){
            console.log('\n\n#### ERROR - PLEASE RUN PREFUNDADDRESSES.JS ###\n\n');
            process.exit(1);
         }

        _totalWorkers = totalWorkers;
        const randomInt = getRandomInt(1, 100);
        const request = [{
            contract: 'simpleStorage',
            readOnly: false,
            verb: 'set',
            args: [workerIndex.toString(), randomInt.toString()]
        }]

        await this.sutAdapter.sendRequests(request);
    }

    async submitTransaction() {
        const randomWorker = getRandomInt(0, _totalWorkers);
        const request = [{
            contract: 'simpleStorage',
            verb: 'get',
            readOnly: true,
            args: [randomWorker]
        }];

        await this.sutAdapter.sendRequests(request);
    }

    async cleanupWorkloadModule() {
        await super.cleanupWorkloadModule();
    }
}

function createWorkloadModule() {
    return new MyWorkload();
}

module.exports.createWorkloadModule = createWorkloadModule;
//submitStorageWorkload.js
'use strict';
const { WorkloadModuleBase } = require('@hyperledger/caliper-core');
const EthereumHDKey = require('ethereumjs-wallet/hdkey');
const Web3 = require('web3');
var _workerIndex = 0;
const privKey = "<your private key>"
const preFundedAccount = '<address associated with privKey>';
const wsAddr = "ws://192.168.1.1:8547"
const masterSeed = "<your seed for deterministic wallet>"
function getRandomInt(min, max) {
min = Math.ceil(min);
max = Math.floor(max);
return Math.floor(Math.random() * (max - min)) + min;
}
class MyWorkload extends WorkloadModuleBase {
constructor() {
super();
this.web3 = new Web3(wsAddr);
this.web3.eth.accounts.wallet.add(privKey);
}
async initializeWorkloadModule(workerIndex, totalWorkers, roundIndex, roundArguments, sutAdapter, sutContext) {
await super.initializeWorkloadModule(workerIndex, totalWorkers, roundIndex, roundArguments, sutAdapter, sutContext);
let hdwallet = EthereumHDKey.fromMasterSeed(masterSeed);
let wallet = hdwallet.derivePath('m/44\'/60\'/' + workerIndex + '\'/0/0').getWallet();
let producedAddress = wallet.getChecksumAddressString();
console.log(`ADDRESS FROM SEED for index ${workerIndex} -> ${producedAddress}`)
this.web3.eth.accounts.wallet.add(wallet.getPrivateKeyString());
let balance = await this.web3.eth.getBalance(producedAddress);
console.log(`${producedAddress} balance ${this.web3.utils.fromWei(balance, 'ether')} ETH`);
if(balance < this.web3.utils.toWei('0.1', 'ether')){
console.log('\n\n#### ERROR - PLEASE RUN PREFUNDADDRESSES.JS ###\n\n');
process.exit(1);
}
_workerIndex = workerIndex;
}
async submitTransaction() {
const randomInt = getRandomInt(1, 100);
const request = [{
contract: 'simpleStorage',
readOnly: false,
verb: 'set',
args: [_workerIndex.toString(), randomInt.toString()]
}]
await this.sutAdapter.sendRequests(request);
}
async cleanupWorkloadModule() {
await super.cleanupWorkloadModule();
}
}
function createWorkloadModule() {
return new MyWorkload();
}
module.exports.createWorkloadModule = createWorkloadModule;Probably you’ve noticed that there is a condition which checks balance and if it is not enough then whole test is dismissed. Before performance tests I run prefundaddresses.js. This is my custom script that makes sure all the deterministic addresses have funds to operate on the network. Same thing could be done within initializeWorkloadModule, but I picked different approach for better code separation. The code is pretty simple, from provided seed 10 deterministic addresses are generated, and for each address the transfer of funds is done.
'use strict';

const EthereumHDKey = require('ethereumjs-wallet/hdkey');
const Web3 = require('web3');

const privKey = "<your private key>"
const preFundedAccount = '<address associated with privKey>';
const wsAddr = "ws://192.168.1.1:8547"
const masterSeed = "<your seed for deterministic wallet>"
const minimumAmountETH = "0.1"
const fundedAmountETH = "0.5"
const totalWorkers = 10

async function init(totalWorkers, minEth, fundEth) {
    const web3 = new Web3(wsAddr);
    web3.eth.accounts.wallet.add(privKey);

    let hdwallet = EthereumHDKey.fromMasterSeed(masterSeed);

    for(let workerIndex = 0; workerIndex < totalWorkers; workerIndex++){
        let wallet = hdwallet.derivePath('m/44\'/60\'/' + workerIndex + '\'/0/0').getWallet();
        let producedAddress = wallet.getChecksumAddressString();
        console.log(`ADDRESS FROM SEED for index ${workerIndex} ->  ${producedAddress}`)
        web3.eth.accounts.wallet.add(wallet.getPrivateKeyString());

        let balance = await web3.eth.getBalance(producedAddress);
        console.log(`${producedAddress} balance ${web3.utils.fromWei(balance, 'ether')} ETH`);

        if(balance < web3.utils.toWei(minEth, 'ether')){
            const gasPrice = await web3.eth.getGasPrice();
            const nonce = await web3.eth.getTransactionCount(preFundedAccount);
            const gasEstimate = await web3.eth.estimateGas({
                from: preFundedAccount,
                to: producedAddress,
                value: web3.utils.toWei(fundEth, 'ether'),
                nonce: nonce
            });

            let txresult = await web3.eth.sendTransaction({
                from: preFundedAccount,
                to: producedAddress,
                value: web3.utils.toWei(fundEth, 'ether'),
                gasPrice: gasPrice,
                gas: gasEstimate,
                nonce: nonce
            });
            console.log(`Account ${producedAddress} has been funded with ${fundEth} ETH`);
            console.log(`Tx Result: ${JSON.stringify(txresult)}`);
        }
    }
    process.exit(0);
}

init(totalWorkers, minimumAmountETH, fundedAmountETH);
Going back to the main part, below you can find Fabric workloads, which seem to be even simpler. There is no need to transfer funds as in the previous example.
//readSimpleStorageContract.js
'use strict';

const { WorkloadModuleBase } = require('@hyperledger/caliper-core');

function getRandomInt(min, max) {
    min = Math.ceil(min);
    max = Math.floor(max);
    return Math.floor(Math.random() * (max - min)) + min;
}

class MyWorkload extends WorkloadModuleBase {
    constructor() {
        super();
    }

    async initializeWorkloadModule(workerIndex, totalWorkers, roundIndex, roundArguments, sutAdapter, sutContext) {
        await super.initializeWorkloadModule(workerIndex, totalWorkers, roundIndex, roundArguments, sutAdapter, sutContext);

        const randomInt = getRandomInt(1, 100);
        console.log(`Worker ${this.workerIndex}: Writing to contract index ${this.workerIndex} value ${randomInt}`);
        const request = {
            contractId: this.roundArguments.contractId,
            contractFunction: 'WriteAsync',
            invokerIdentity: 'admin',
            contractArguments: [this.workerIndex, randomInt.toString()],
            readOnly: false
        };

        await this.sutAdapter.sendRequests(request);
    }

    async submitTransaction() {
        const myArgs = {
            contractId: this.roundArguments.contractId,
            contractFunction: 'ReadAsync',
            invokerIdentity: 'admin',
            contractArguments: [this.workerIndex],
            readOnly: true
        };

        await this.sutAdapter.sendRequests(myArgs);
    }

    async cleanupWorkloadModule() {

    }
}

function createWorkloadModule() {
    return new MyWorkload();
}

module.exports.createWorkloadModule = createWorkloadModule;
//submitSimpleStorageContract.js
'use strict';
const { WorkloadModuleBase } = require('@hyperledger/caliper-core');
function getRandomInt(min, max) {
min = Math.ceil(min);
max = Math.floor(max);
return Math.floor(Math.random() * (max - min)) + min;
}
class MyWorkload extends WorkloadModuleBase {
constructor() {
super();
}
async initializeWorkloadModule(workerIndex, totalWorkers, roundIndex, roundArguments, sutAdapter, sutContext) {
await super.initializeWorkloadModule(workerIndex, totalWorkers, roundIndex, roundArguments, sutAdapter, sutContext);
}
async submitTransaction() {
const randomInt = getRandomInt(1, 100);
const request = {
contractId: this.roundArguments.contractId,
contractFunction: 'WriteAsync',
invokerIdentity: 'admin',
contractArguments: [this.workerIndex, randomInt.toString()],
readOnly: false
};
await this.sutAdapter.sendRequests(request);
}
async cleanupWorkloadModule() {
}
}
function createWorkloadModule() {
return new MyWorkload();
}
module.exports.createWorkloadModule = createWorkloadModule;Fabric is a specific blockchain, the functionality of which is based on MSP (membership provider – a specific structure of files and folders that help identify an account). In presented workflows for Fabric, ‘admin’ account is used but this is not enough from the Caliper perspective. As we would like to run the test against specific environment, there is the need to provide a network configuration file. It refers to the artifacts that relate to the organization. Just to make sure that these files are available during the test execution it is recommended to copy the required part to the working directory.
#networks/fabric.yaml
name: Hyperledger Caliper to test Hyperledger Fabric
version: "2.0.0"

caliper:
  blockchain: fabric

channels:
  - channelName: mychannel
    contracts:
    - id: SimpleStorage

organizations:
  - mspid: org1MSP
    identities:
      certificates:
      - name: 'admin'
        clientPrivateKey:
          path: 'organizations/peerOrganizations/org1/admin/msp/keystore/priv_sk'
        clientSignedCert:
          path: 'organizations/peerOrganizations/org1/admin/msp/signcerts/cert.pem'
    connectionProfile:
      path: './connection-profile/fabric.json'
      discover: true
The above presented file also refers to an additional file in the connection-profile folder – fabric.json. Looking at this file (listed below) there are a few sections that are important, depending on your network configuration and names, you may want to update it accordingly, especially where ‘org1’ appears, or a channel name. Keep in mind that all the paths are considered in terms of the working directory for Caliper. Again, there is a reference to the organization artifacts. TlsCaCert can be provided as a string (with pem key-value pair) or as a path to the file. And the whole file in my case looks like this (certificate content at the end, has been shrunk for readability):
{
    "name": "fabric",
    "version": "1.0.0",
    "client": {
        "tlsEnable": true,
        "adminCredential": {
            "id": "exploreradmin",
            "password": "exploreradminpw"
        },
        "enableAuthentication": false,
        "organization": "org1MSP",
        "connection": {
            "timeout": {
                "peer": {
                    "endorser": "300"
                },
                "orderer": "300"
            }
        }
    },
    "channels": {
        "mychannel": {
            "peers": {
                "peer1-org1": {}
            }
        }
    },
    "organizations": {
        "org1MSP": {
            "mspid": "org1MSP",
            "fullpath": false,
            "adminPrivateKey": {
                "path": "/organizations/peerOrganizations/org1/admin/msp/keystore/priv_sk"
            },
            "peers": ["peer1-org1"],
            "signedCert": {
                "path": "/organizations/peerOrganizations/org1/peer1/msp/signcerts/cert.pem"
            }
        }
    },
    "peers": {
        "peer1-org1": {
            "tlsCACerts": {
                "pem": "-----BEGIN CERTIFICATE-----\nMIICEzCCAbqgAwIBA…\n-----END CERTIFICATE-----\n"
            },
            "url": "grpcs://peer1-org1:7051"
        }
    }
}
Network configuration file for Hyperledger Besu is different and instead of YAML file we have JSON format. It specifies properties that are used during tests, such as accounts, private keys, or seed for deterministic wallet accounts, chainId and contracts. It is an input for Ethereum-connector that is used within Caliper. It is worth mentioning that, if fromAddressSeed is used, then other options like ‘fromAddress’, ‘fromAddressPrivateKey’ or ‘fromAddressPassword’ are not considered by Ethereum-connector. If you are interested in details, the best place to check will be Ethereum-connector.js file on Caliper’s github. It is good when you need to introduce some additional logging when something is not working as it is supposed to – extending this file with custom information might deliver a lot of new prospects. At the end of the file, there is a ‘contracts’ section where path and application binary interface (ABI) need to be delivered – these can be obtained from a compiled solidity contract.
{
    "caliper": {
        "blockchain": "Besu-ethereum"
    },
    "ethereum": {
        "url": "ws://192.168.1.1:8547",
        "contractDeployerAddress": "<deployer address starting with 0x>",
        "contractDeployerAddressPrivateKey": "<deployer PrivKey starting with 0x>",
        "fromAddress": "<address starting with 0x>",
        "fromAddressPrivateKey": "<privKey starting with 0x>",
        "fromAddressPassword": "<password needed to unlock account>",
        "fromAddressSeed": "<hexadecimal seed starting with 0x>",
        "transactionConfirmationBlocks": 12,
        "chainId": 1337,
        "gasPrice": 10,
        "contracts": {
            "simpleStorage": {
                "path": "contracts/ethereum/SimpleStorage.json",
                "abi": [{"constant":true,"inputs":[{"name":"","type":"uint256"}],"name":"dict","outputs":[{"name":"","type":"uint256"}],"payable":false,"stateMutability":"view","type":"function"},{"constant":false,"inputs":[{"name":"_place","type":"uint256"},{"name":"_value","type":"uint256"}],"name":"set","outputs":[],"payable":false,"stateMutability":"nonpayable","type":"function"},{"constant":true,"inputs":[{"name":"_place","type":"uint256"}],"name":"get","outputs":[{"name":"","type":"uint256"}],"payable":false,"stateMutability":"view","type":"function"}],
                "address": "<address of a deployed contract>",
                "estimateGas": true
            }
        }
    }
}
Finally, we can consider contracts that were used during this whole process. If you are following this article step by step, then no updates are required, but if you would like to test different contracts then some updates are necessary, especially where ‘simpleStorage’ contract is mentioned. However, it is intuitive and, if you have basic knowledge, you shouldn’t have any problems with it.
Considering smart contracts, we used two basic ones that will just store value. With two methods delivered, one for saving and the other one for reading, no parameters checking, no complex logic – just simple storage. Chaincode (smart contract) for Hyperledger Fabric has been written in typescript and smart contract for Hyperledger Besu has been written in Solidity. There are slight differences, but the general idea is the same.
//contracts/fabric/simple-storage.ts
import {
    Context,
    Contract,
    Info,
    Returns,
    Transaction,
} from "fabric-contract-api";

@Info({
    title: "SimpleStorage",
    description: "simple storage contract",
})
export class SimpleStorage extends Contract {
    @Transaction()
    public async WriteAsync(
        ctx: Context,
        id: number,
        value: string,
    ): Promise<void> {
        ctx.stub.putState(id.toString(), Buffer.from(JSON.stringify(value)));
    }

    @Transaction(false)
    @Returns("string")
    public async ReadAsync(ctx: Context, id: number): Promise<string> {
        const value = await ctx.stub.getState(id.toString());
        return value.toString();
    }
}
//contracts/besu/simple-storage.ts
pragma solidity >=0.4.0 <0.9.0;
contract Storage {
mapping(uint256 => uint256) public dict;
function set(uint256 _place, uint256 _value) public {
dict[_place] = _value;
}
function get(uint256 _place) public view returns (uint256) {
return dict[_place];
}
}Approach overview:
- I used Fixed Rate as a rate controller – it is the most basic controller that is available in the presented framework. It will send input transactions at a fixed interval, which is specified as transactions per second (TPS). I increased it over time, that is why at the end I can present some basic diagrams. You can find this value in the benchmark definition.
- The total number of workers, as you could notice, is determined as 5. You can find this value in the benchmark definition.
- Test duration (round), specified by parameter txDuration, equals 20 (in seconds). You can find this value in the benchmark definition.
- Empiric testing with increased TPS round by round. I have chosen such an approach because during my initial testing I found out that the WebSocket connection used for Hyperledger Besu can be disconnected during high workload and then all the succeeding test rounds will also fail. And in terms of Fabric, there is a limitation of 2500 concurrent requests. Additionally, I would like to avoid the situation when there are some leftovers (unprocessed transactions) from one round, despite the 5-second break between rounds – it shouldn’t happen, but better be safe than sorry.
- In case of Hyperledger Fabric there is no need to have any coin or token necessary for transactions processing, but in case of Hyperledger Besu we need to prefund addresses that will be used during the benchmark. Having multiple workers and the same address is a bad idea because eventually when we post transactions to the blockchain, we will face transactions with the same nonce used. That would be the problem with the test design. So, to avoid it, it is a good idea to use deterministic wallet, which from a given passphrase combined with an index can generate the same addresses (that is why it is called deterministic). Then we need to transfer some test ethereum to these addresses and then they can be successfully used during tests. As you can see, it is strictly connected with the type of blockchain that is tested, but if you are considering such a challenging topic as blockchain performance, I assume that you know how to prepare valid transaction.
Results:
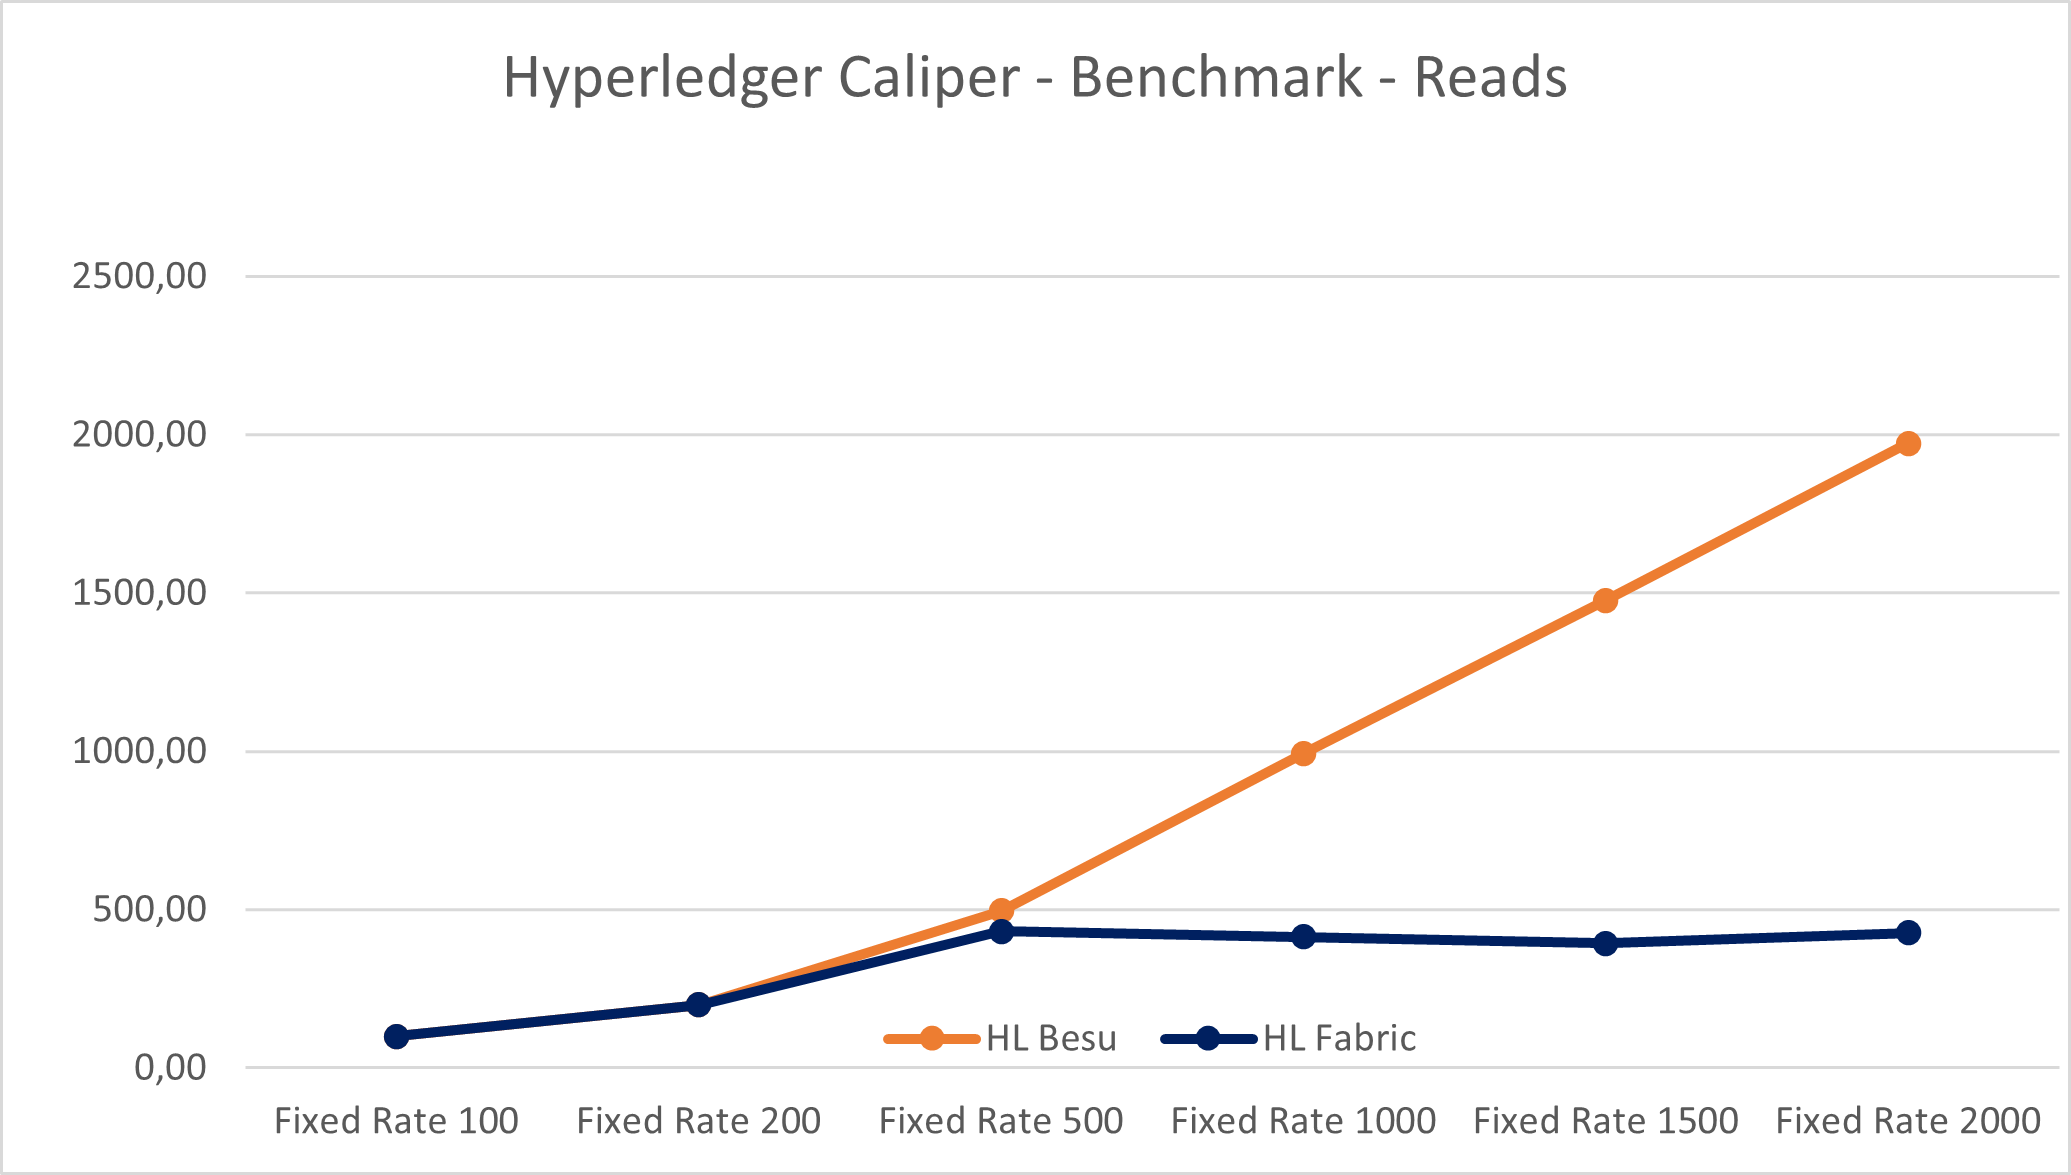
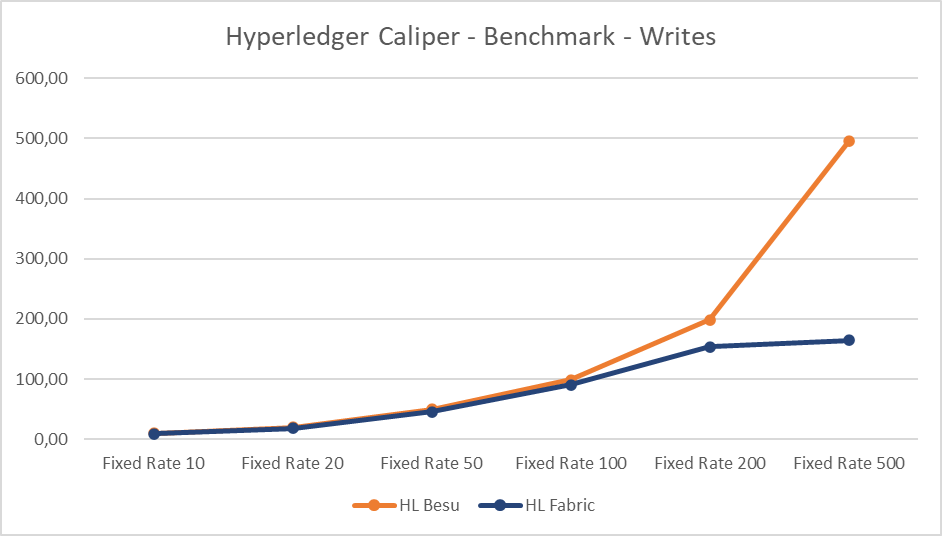
Conclusion: In my tests, Hyperledger Besu behaves better for writes and reads. It seems that it can handle as much as you need it to* (probably there is a limit) in terms of reads, but such an action does not need to be a blockchain transaction – it is only a lookup for the value. Fabric is limited by its architecture and inability to serve values instantly, and in this example the upper limit is below 450 TPS. In the other benchmark, writes seem to oscillate above 100TPS, HL Besu can achieve the requested 500TPS, but HL Fabric again achieved its upper limit. Fabric also has a checkpoint of around 2500 concurrent transactions requested and the possibility of going over this limit is blocked.

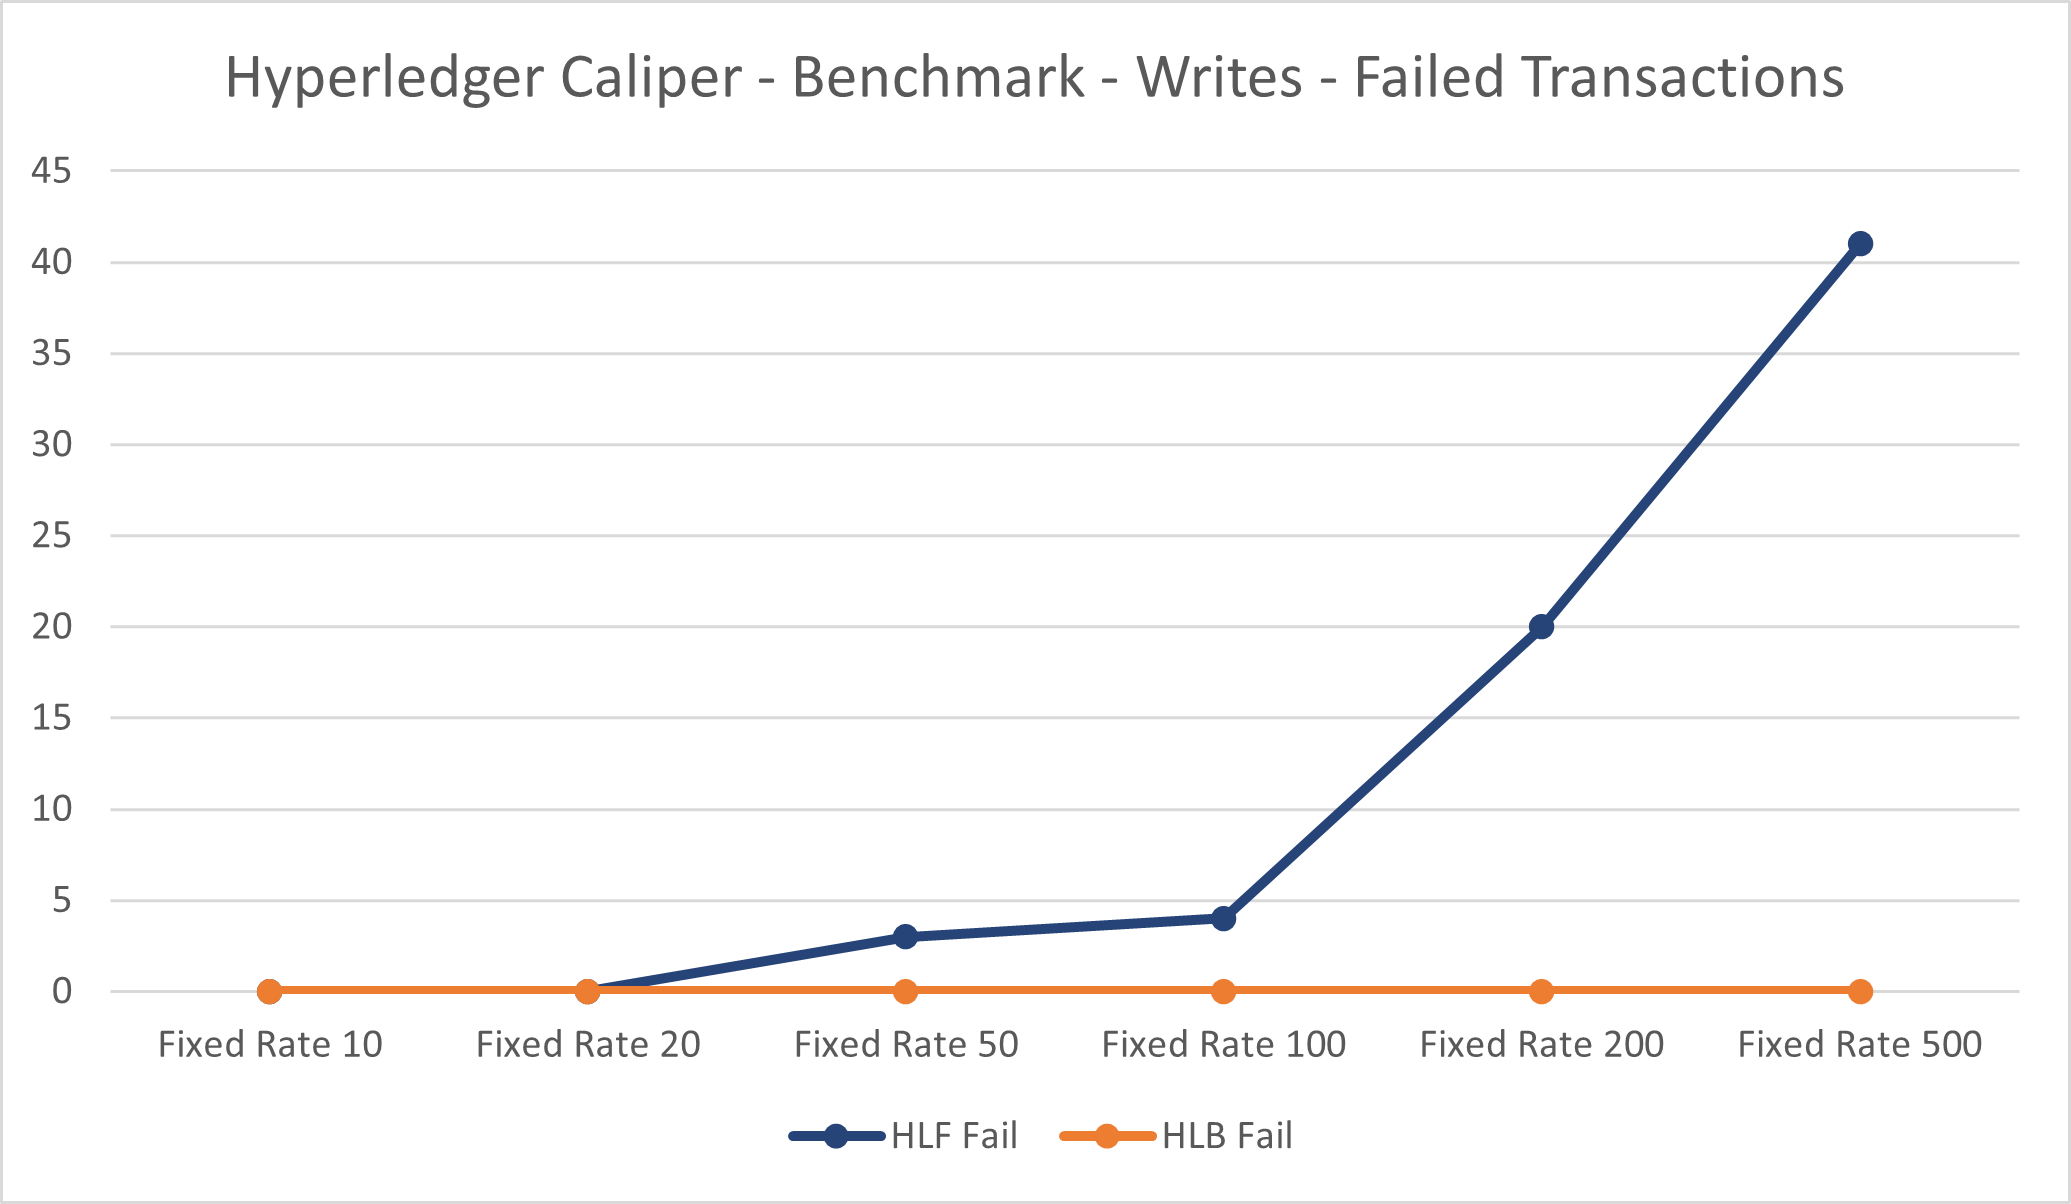
Conclusion: These two diagrams show how many transactions were successfully processed over the test duration of 20 sec, concerning changing the state of the contract. As you can see, there is a discrepancy between these two, and over time, when the number of concurrent transactions is increased, HL Fabric starts to fail some of the transactions and they need to be repeated.
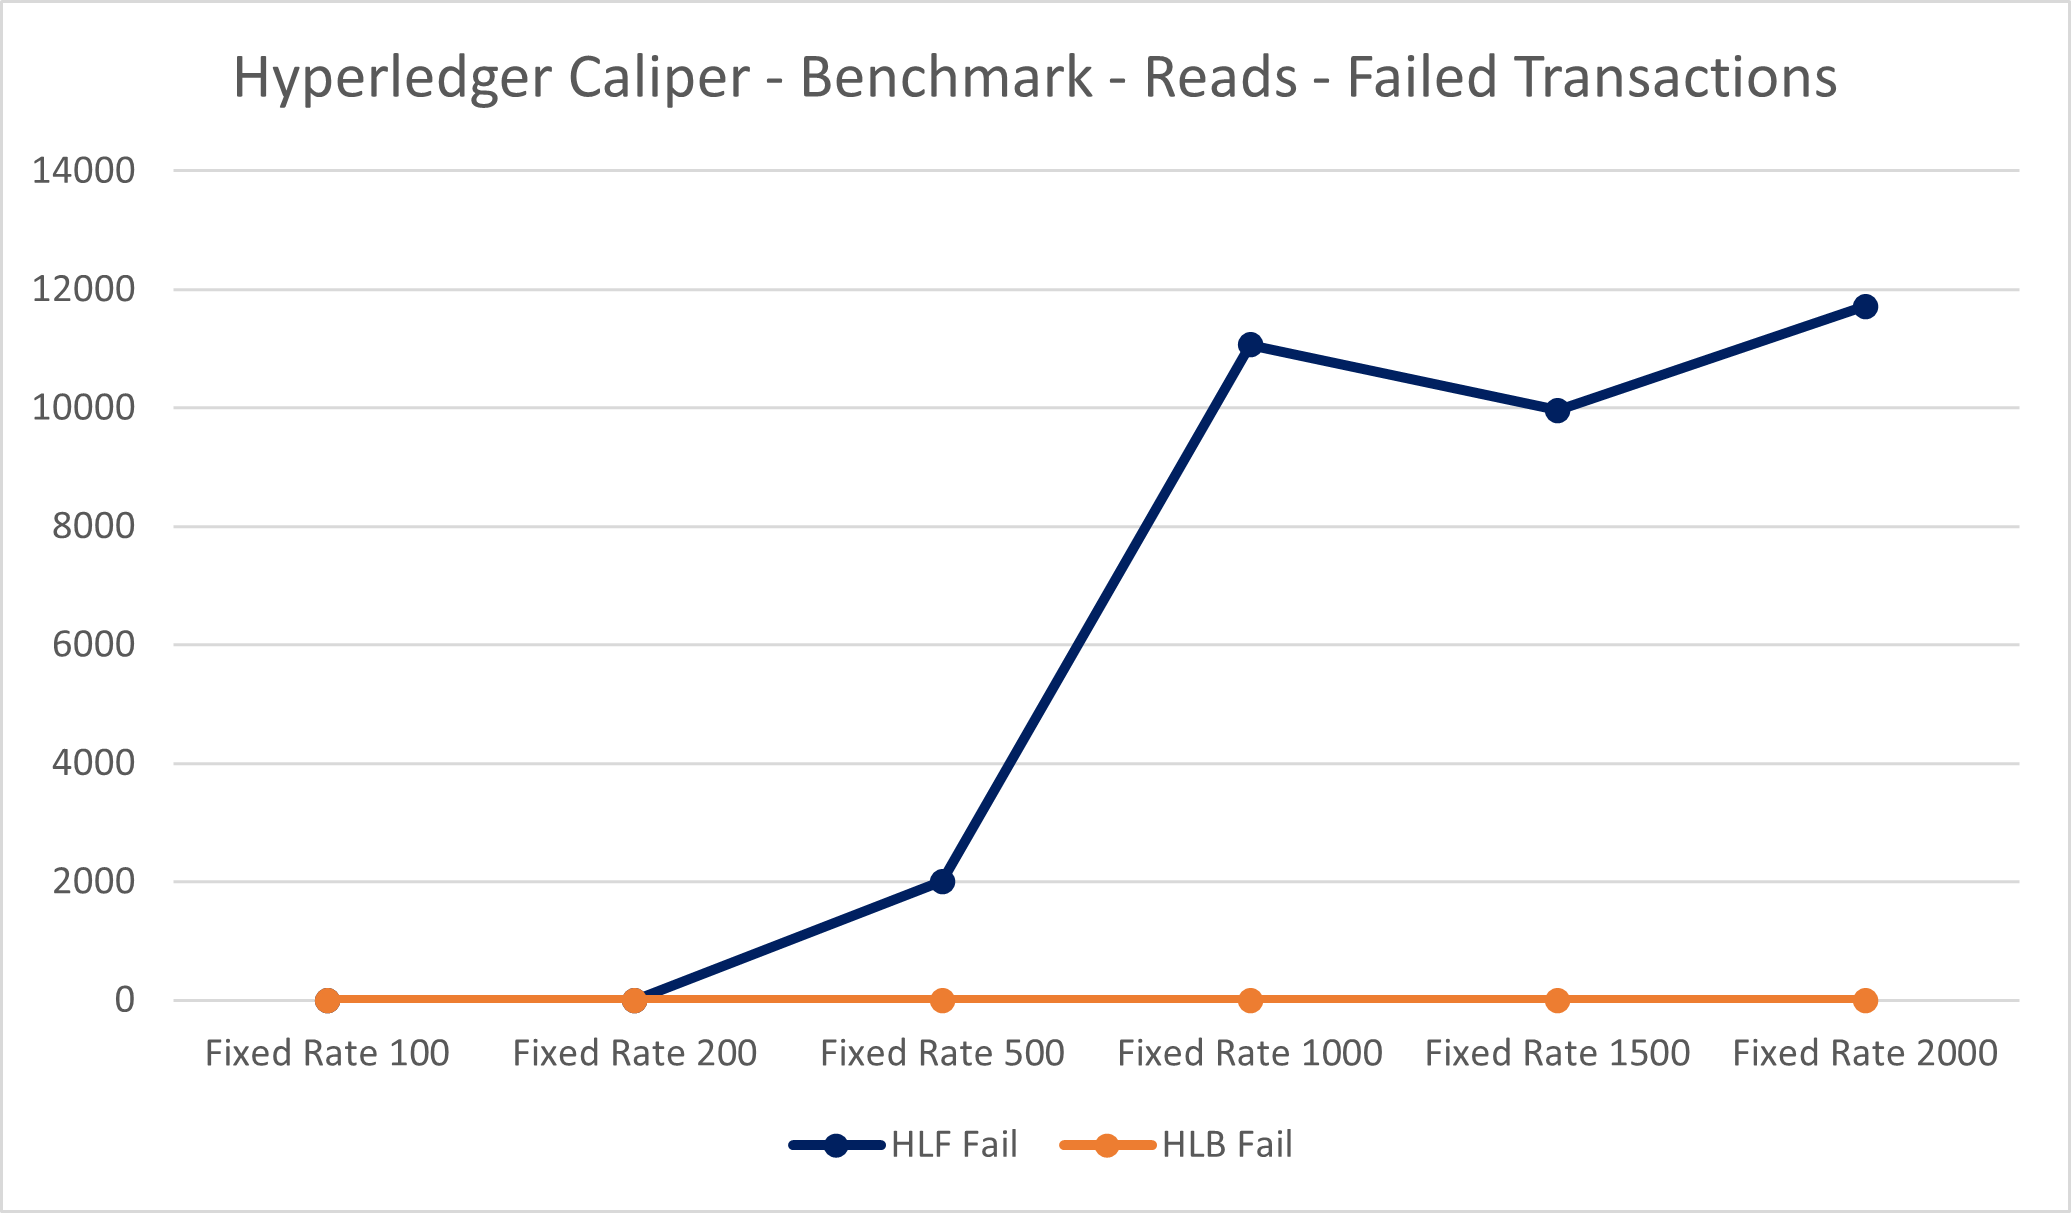
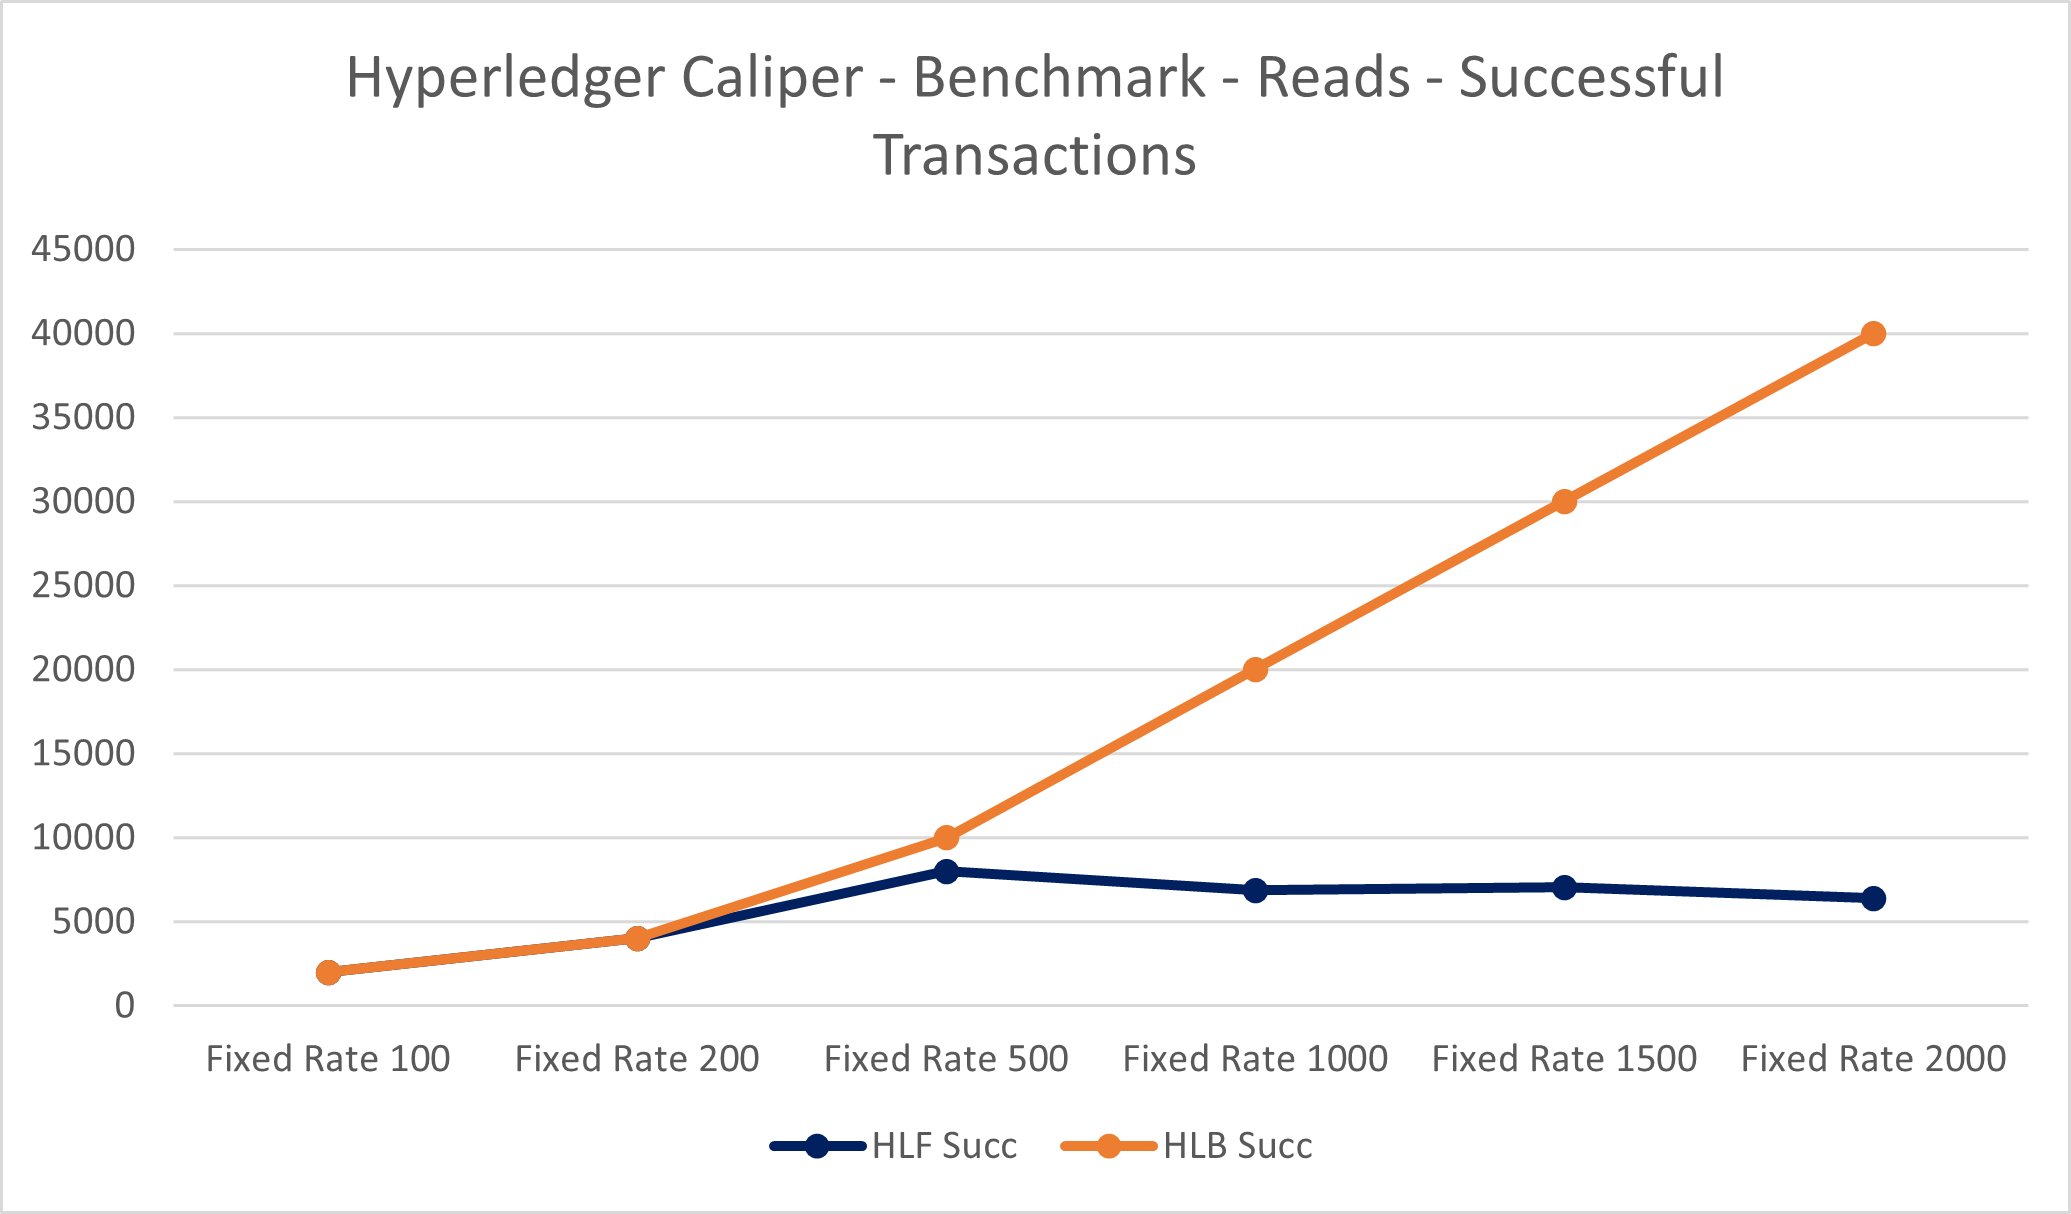
Conclusion: As in the previous example, these two show how many transactions were successfully processed over the test duration of 20 sec, but this time concerning reading the value of the contract. The numbers are much higher, because the load was also much bigger than in the writing example. In both examples, Besu performs without failures, at least at these levels that were used during testing.
Final note:
Hyperledger Caliper is a great tool for testing blockchain ability to perform at a desired scale and topology. When we find out some worrying metrics, then we can try to apply some changes, or rather tuning to our configuration, which can significantly improve performance. It is not an easy task, but certainly worth spending some time on, especially when we expect a specific load.
As I wrote at the beginning, blockchain is not a panacea for every problem, but its pros & cons should be considered, just as in case of other technologies or frameworks, and having that in mind, we can design systems that are based on an educated decision, not biased by myths or assumptions that sometimes are just a misunderstanding.