Prototype fast using AWS solutions
- Processes, standards and quality
- Technologies
- Others
A mature business constantly develops and evaluates new concepts. Sometimes new ideas are strictly related to the software. It is beneficial to verify them quickly and receive valuable feedback, so the business managers can take it or leave it. In this text I’m going to present how the Amazon Web Services cloud can be used for swiftly building a Proof of Concept application by applying the existing elements.
Amazon Web Services (AWS) could be compared to a bag of bricks, where every brick is a solution of some well-known problem. As with the bricks we could easily and fast bring our ideas alive, we can do the same with AWS. Imagine that our business need is to send SMS notifications to the specific phone number after the user has moved away from a certain area. Consider what resources would be needed to achieve such a goal. How long would it take to build it?
We are going to build a prototype for that business need using AWS web interface called AWS Management Console (let’s call it Console). It is worth mentioning that all the steps are possible to do using the command-line interface, however, it won’t be quick for a one time job.
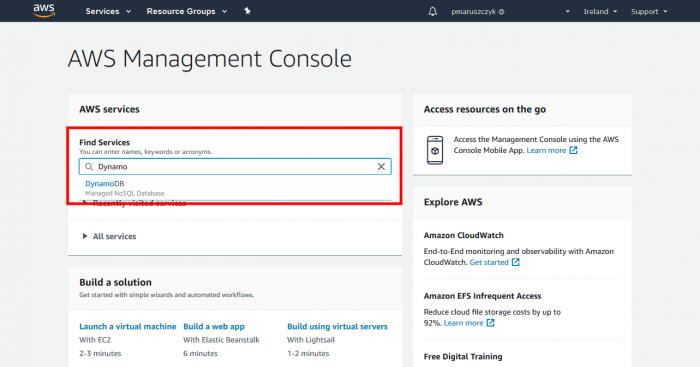
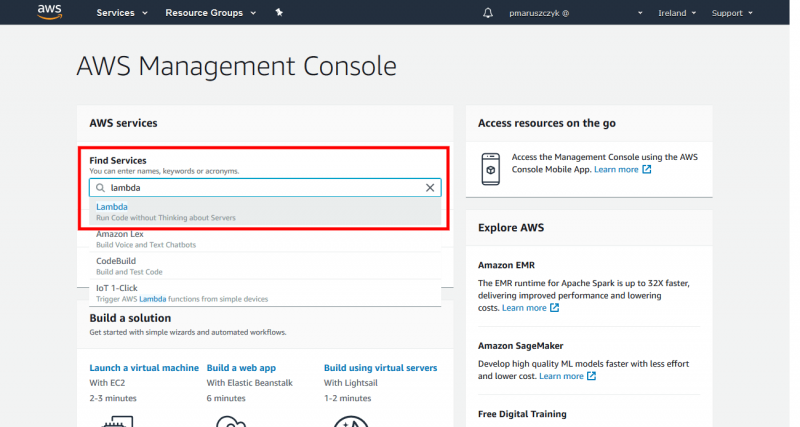
First, we need a database. AWS offers us NoSQL solution in the form of DynamoDB. In Console’s Find Services field type Dynamo and click DynamoDB.
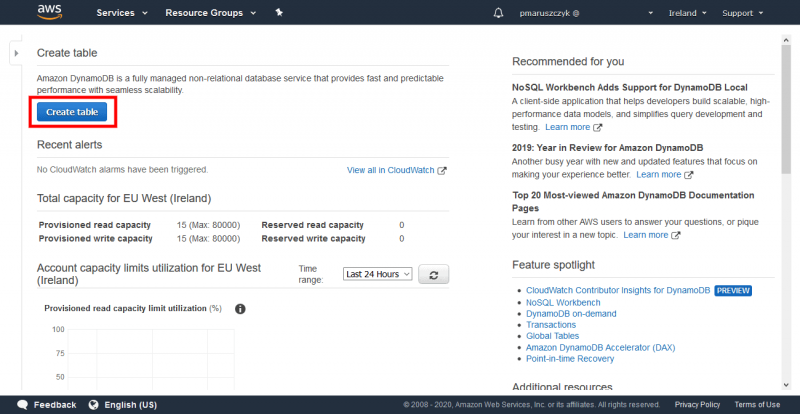
Click Create table.
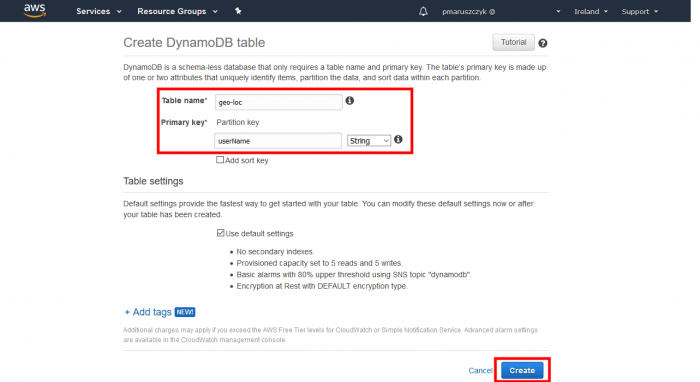
On the next screen type geo-loc in Table name, userName in Primary key and click Create.
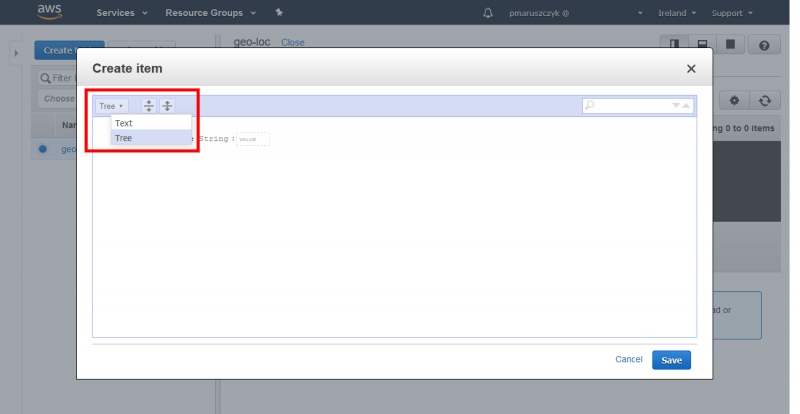
After the table is done, we create an item which contains the first notification. In tab Items click Create Item.

Select Text in the popup, paste the data from the next code listing (don’t forget to replace the phone number with yours) and Save.
{
"userName": "john",
"locations": [],
"areas": [
{
"latitude": "50.2783333",
"longitude": "18.6830891",
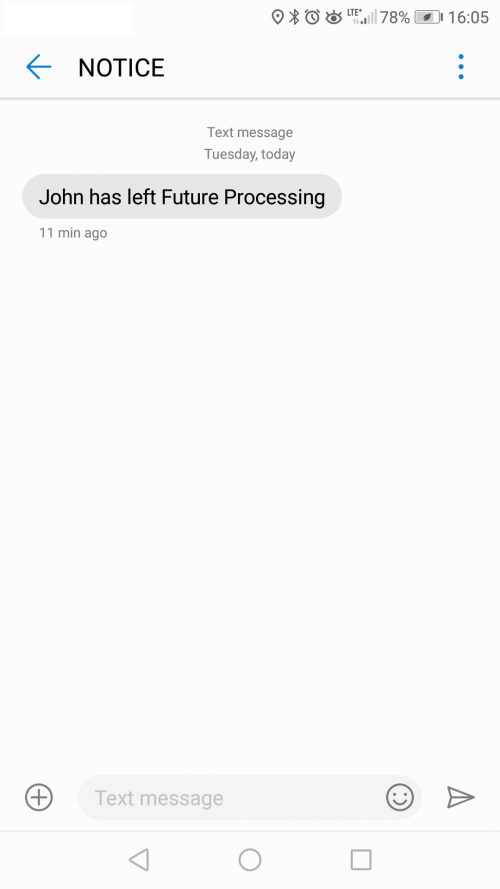
"notification": {
"message": "John has left Future Processing",
"phone": "+48000000000"
},
"radius": 1
}
]
}The item contains userName which is the user identifier, an array for visited locations and areas which are being checked for leaving. The area object is defined by latitude, longitude and radius in km. After leaving the area, a text message will be sent to the given phone number.
The database is ready, therefore it’s time to think about the environment where the app is going to work. A perfect “brick” for it will be the AWS serverless solution which is called Lambda. This type of solution, despite its name, employs servers, however, they are fully maintained by the cloud provider, so that you can focus on the software part (pros and cons of serverless can be found in a post by Tomasz Kus: Serverless with Java). We are going to write business logic using the node.js environment. Let’s dive into the code.
At the beginning we set the region of the AWS data center. I’m using the Irish one, so there is eu-west-1, but if you want to use something else, then put there your choice. We also create the DynamoDB client and the client for sending texts which is provided by Simple Notification Service (SNS).
const AWS = require('aws-sdk');

AWS.config.update({region: 'eu-west-1'});

const documentClient = new AWS.DynamoDB.DocumentClient();
const sns = new AWS.SNS({apiVersion: '2010-03-31'});
Then we prepare functions for getting user’s data. The first one creates a stub for a new user, the second one gets the data from the database. As this is a prototype then the table name is hardcoded, however in a full-time solution, it can be done as an environment variable.
const createStub = async (userName) => {
	const putParams = {
    		TableName: 'geo-loc',
    		Item: {
        		areas: [],
      	  	locations: [],
        		userName: userName,
    		}
	};

	await documentClient.put(putParams).promise();
	return putParams;
};

const getUserData = async (userName) => {
	const getParams = {
    	TableName: 'geo-loc',
    	    	Key: {
        	    	userName: userName
    	    	}
	};

	let result = await documentClient.get(getParams).promise();

	if (!("Item" in result)) {
    	    	result = await createStub(userName);
	}

	return result.Item;
};
We also need to send some texts. It can be done by one object with two properties (Message and PhoneNumber) which has to be published by SNS API.
const notifyWatcher = async (area) => {
	const smsParams = {
    	    	Message: area.notification.message,
    	    	PhoneNumber: area.notification.phone,
	};

	try {
    	    	await sns.publish(smsParams).promise();
    	    	console.log("SMS sent: " + JSON.stringify(smsParams));
	}
	catch (e) {
    	    	console.error("Sending SMS failed: " + JSON.stringify(e));
	}
};
The assumption is that the user will be moving, so we wrote the function to update their location. It takes the last locations, adds a new one, and removes the oldest.
const addCurrentLocation = async (userData, location) => {
	let locations = userData.locations;

	locations.unshift(location);
	locations = locations.slice(0, 10);

	const updateParams = {
    	    	TableName: 'geo-loc',
    	    	Key: {
        	    	userName: userData.userName
    	    	},
    	    	UpdateExpression: "set locations = :locations",
    	    	ExpressionAttributeValues: {
        	    	":locations": locations
    	    	}
	};

	return await documentClient.update(updateParams).promise();
};
The next step is to create a few helpers functions that will filter the areas.
const filterToVisitedAreas = (areas, previuosLocation) => {
	return areas.filter(area => locationIsInArea(previuosLocation, area));
};

const filterToLeftAreas = (areas, currentLocation) => {
	return areas.filter(area => !locationIsInArea(currentLocation, area));
};

const locationIsInArea = (location, area) => {
	return area.radius > distanceInKm(location, area);
};
Since the Earth is round and the areas can be big, it is safe to measure the distance between points with the Haversine formula.
const distanceInKm = (location1, location2) => {
  const earthRadiusInKm = 6371;
  const differenceOfLatitudes = degreesToRadians(location2.latitude - location1.latitude);
  const differenceOfLongitudes = degreesToRadians(location2.longitude - location1.longitude);
  const a =
	Math.sin(differenceOfLatitudes / 2) *
	Math.sin(differenceOfLatitudes / 2) +
	Math.cos(degreesToRadians(location1.latitude)) *
	Math.cos(degreesToRadians(location2.latitude)) *
	Math.sin(differenceOfLongitudes / 2) *
	Math.sin(differenceOfLongitudes / 2);

  const distanceInKm = 2 * earthRadiusInKm * Math.asin(Math.sqrt(a));

  return distanceInKm;
};

const degreesToRadians = (degrees) => {
  return degrees * (Math.PI/180);
};
Functions are prepared, so now there’s time to write an entry point – the handler which takes an event object. Its implementation is quite easy. After it gets data from a request and the user from the database, the locations are being checked in terms of left areas and optionally the notification is being sent. In the end, the current location is stored and execution finishes.
exports.handler = async (event) => {
	const requestParameters = JSON.parse(event.body);

	const userData = await getUserData(requestParameters.userName);
	const currentLocation = {
  	    	latitude: parseFloat(requestParameters.latitude),
  	    	longitude: parseFloat(requestParameters.longitude),
	};

	if (userData.locations && userData.locations.length) {
    	    	const previousLocation = userData.locations[0];
    	    	const lastVisitedAreas = filterToVisitedAreas(userData.areas, previousLocation);
    	    	const areasLeftByUser = filterToLeftAreas(lastVisitedAreas, currentLocation);
    	    	for (const area of areasLeftByUser) {
        	    	await notifyWatcher(area);
    	    	}
	}

	await addCurrentLocation(userData, currentLocation);

	const response = {
    	    	statusCode: 200,
	};

	return response;
};
* Complete code can be found at: https://github.com/pmaruszczyk/aws-geo-loc
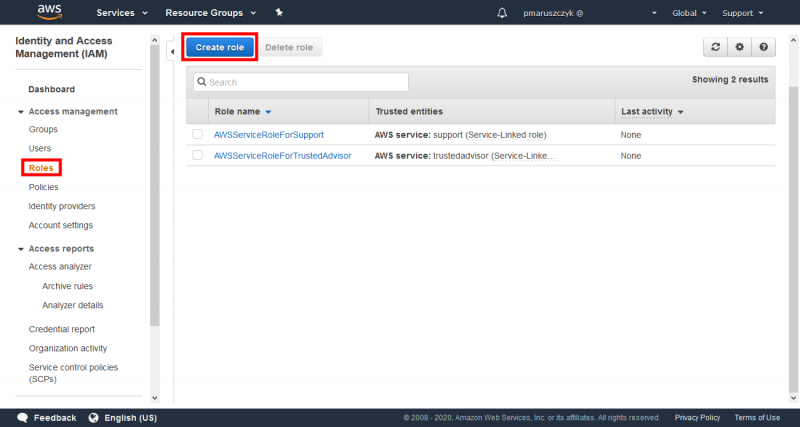
Once the code is ready, go back to Console and find IAM which stands for Identity and Access Management.
Lambda, which we are about to create, needs a role with the access to the required services, therefore go to Roles visible in menu on the left and click Create role.
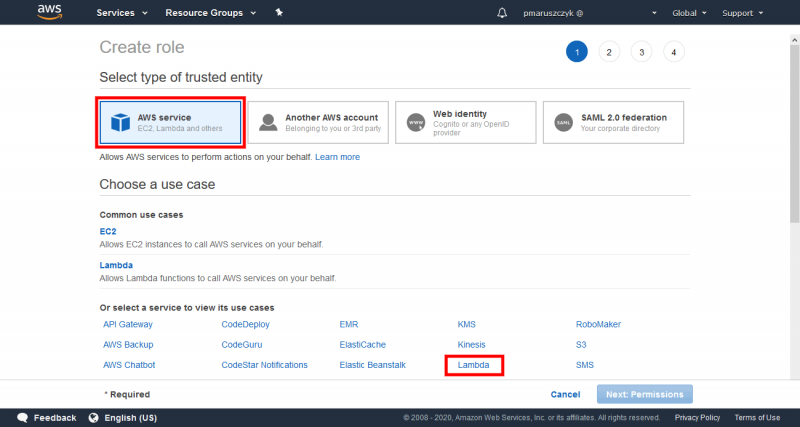
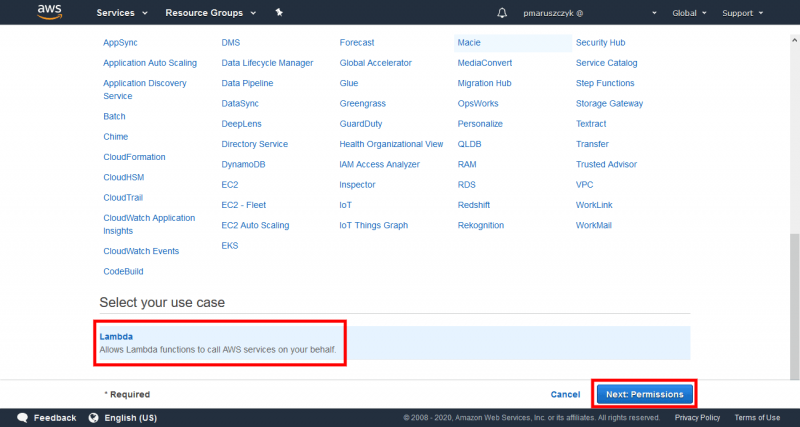
Choose AWS service and Lambda. Go to Next: Permissions.
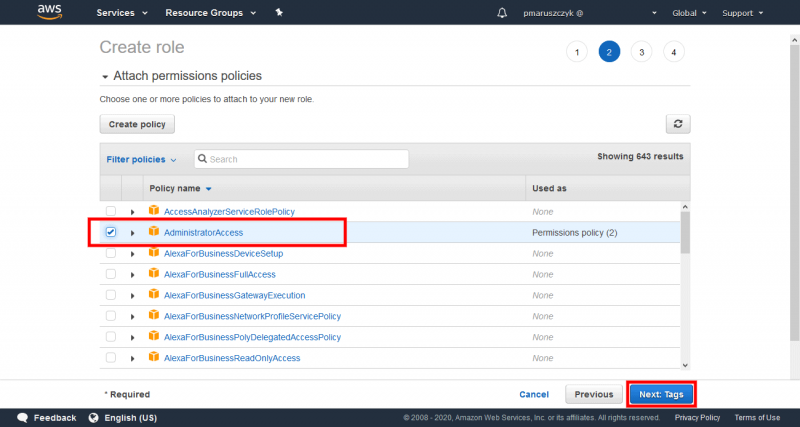
Select AdministratorAccess. This is a policy with wide access rights, which is good enough as we seize the opportunity, but in production conditions it should be limited to the necessary resources’ rights.
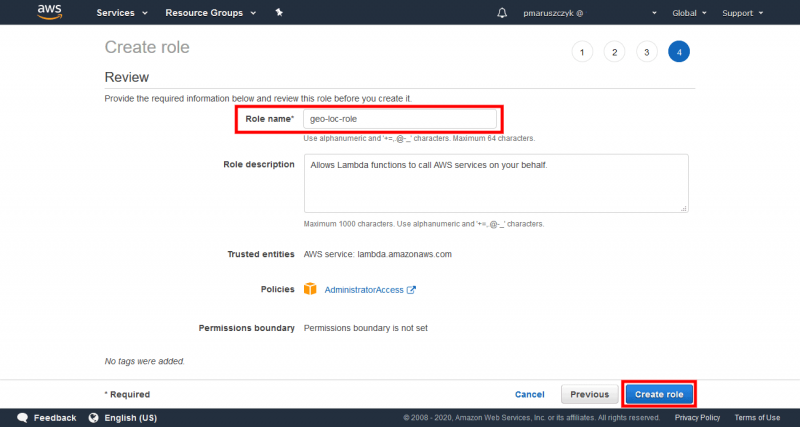
Click Next: Tags, there is nothing needed, so let’s continue to the last step. Type geo-loc-role in Role name and Create role.
Quick summary: Database with an exemplary item is ready, node.js code and access role are ready too.
Let’s connect it all together. Go to Console and search for Lambda.
Click Createfunction, choose Author from scratch, put the name (e.g. geo-loc) and then click Create function once more.


On the new page, the first step is to scroll down to Function code and paste code created earlier into the editor.

Next, scroll to Execution role, select Use an existing role and choose geo-loc-role created earlier. Save.

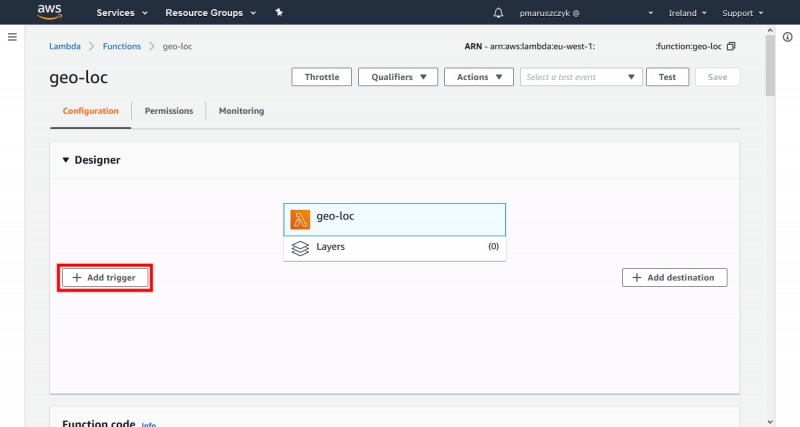
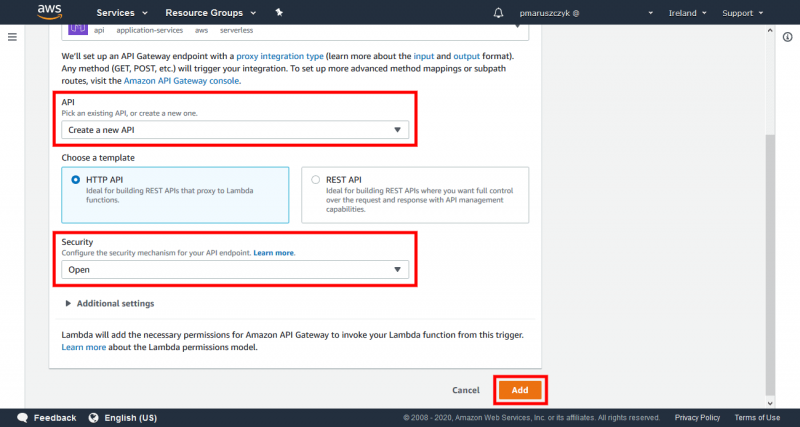
Lambda is ready, however, we also have to make it publicly available. On geo-loc’s page scroll to the top and click Add trigger.
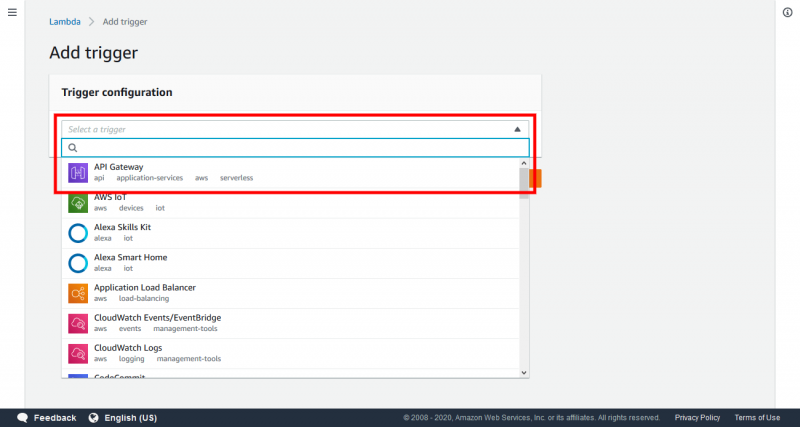
Select API Gateway.
Choose Create a new API, then Open and click Add.
Now our lambda is done and we can check it. Create geoloc.html file on your PC with the code below (file is available on github: https://github.com/pmaruszczyk/aws-geo-loc):
<!DOCTYPE html>
<html lang="en">
<head>
   <meta charset="UTF-8">
   <script>
       const api = '<your lambda link here>';
       const userName = 'john';
       function sendPosition(latitude, longitude) {
           fetch(
               api,
               {
                   method: 'POST',
                   body: JSON.stringify({
                       latitude: latitude,
                       longitude: longitude,
                       userName: userName,
                   }),
               }
           )
       }
   </script>
</head>
<body>
<button onclick="sendPosition(50.278333, 18.683089)">Future Processing, F4 building</button>
<button onclick="sendPosition(50.294105, 18.665819)">Gliwice, city centre</button>
</body>
</html>
Replace <your lambda link here> with URL which can be found on the lambda’s page. Click API Gateway and copy your endpoint url.

Open the geoloc.html in your browser, test the system by using location buttons and enjoy the result (be aware that sending texts can generate some costs after reaching the free tier limit):
Tip: Don’t forget to destroy all created services (API Gateway, DynamoDB table, lambda) to minimize costs that have to be taken for tests.
To sum up, we have created the prototype in the relatively short period of time, depending on the technical skills. For an experienced developer, who is accustomed with the AWS “bricks”, I believe it will be a matter of a few hours to implement and test this solution. Thanks to Lambda and the API Gateway there was no need to prepare a server, node.js environment nor the public link for service – we just focusedon the value, not on technicalities. As you could see, the composition of Console UI makes it easy to jump from one service to another (for instance a gateway can be reached just from the lambda configuration page). Please also note we have done it using the web interface and many options have been set by default in it, so we have done just a few clicks. Now, when the prototype is ready, business can check how it works and decide if it helps to reach the goals.