Introduction to Claims-Based Authentication and Authorization in .NET
- Processes, standards and quality
- Technologies
- Others
The article describes the term of Claims-Based Authentication and its principles of operation on .NET platform and benefits of using this kind of approach. This article is the first one of the series, in the next one the implementation processes and more scenarios will be presented.
Authentication and Authorization
Authentication and authorization are two closely related concepts, which are used to build security mechanism in systems and applications. Information security is the practice of protecting information from unauthorized access, use or even modification. Confidentiality, integrity and availability (known as CIA triad) is a model designed to guide policies of information security within an organization. In this article we are focusing on confidentiality, which refers to restriction of access to sensitive information that can be achieved by authentication and authorization.
Authentication allows to verify someone’s identity in the system (e.g. Are you User X in the system Y?). The following method, based on user and password, is still one of the most common solutions. However, nowadays there are other methods in use, especially those based on PKI (Public Key Infrastructure) or biometrics.
Generally, all authentication methods work in the same scenario – user sends some data to application (or system) which allows to identify him (e.g. username and password, certificate, finger print), and application verifies if the “user identity” exists in its id store (data base, trusted certificate store).
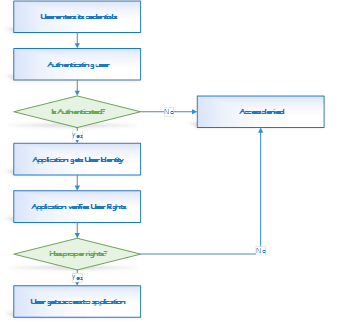
Authorization verifies „what you are authorized to do (describes user permissions)” based on user identity, which was verified in the authentication process. Many applications use roles to describe user rights (e.g. user in Admin role is allowed to create others users, user in Reporter role has right to print reports) – after positive authentication process for user identity roles are assigned. In the figure below a typical authentication and authorization process has been presented.
Figure 1. Typical authentication and authorization process.
A „classical authentication” approach means that every application has its own authentication mechanism that leads to many different problems. There are lots of ways to build identity support into an application, and each communication framework treats identity differently, with different object or storage models. One of the most important problems of this approach is dispersion of the user identity. Each application stores its own copy of user data, which is used to build user identity. Very often user data (identities) are duplicated in multiple applications or systems, generating problem of data integrity. This kind of approach to authentication does not support Single Sign On (SSO) mechanism. Nowadays, mechanism called SSO is becoming more and more popular due to possibility for allowing authentication in many applications using one application of user identity. User logs once (authenticates and authorizes) and gains access to all systems without being prompted to log in again. Using Active Directory (and authentication based on AD) partially solved problem with SSO. Despite its advantages AD approach cannot be used in every situation.
Claims-Based Identity
One step toward to solve those problems is to stop building custom identity plumbing and user account databases into every new application. Claims-based identity is a straightforward idea, founded on a limited number of concepts: claims, tokens, identity providers, and a few more. This approach helps us to reduce the excess of identity management by providing a central point for user and role administration (providers support for Single Sign On mechanism).
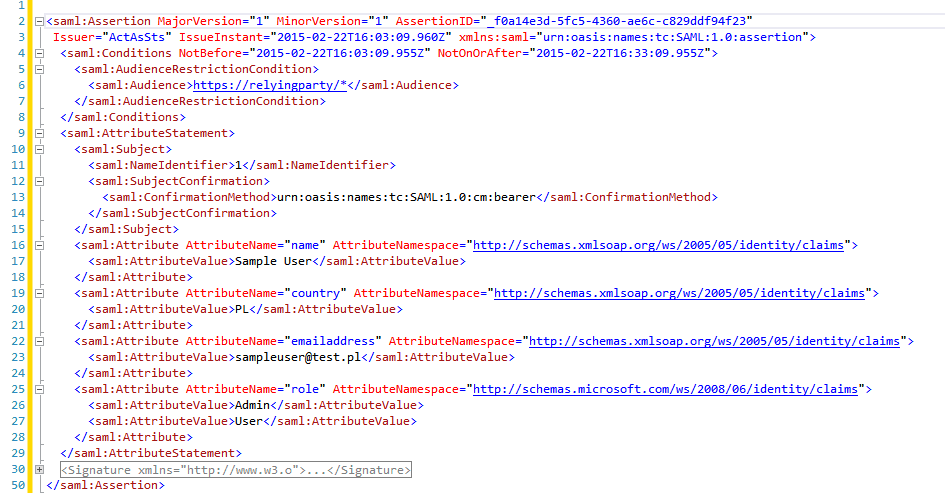
Claims can contain information about the user, roles or permissions, useful to build flexible authorization model. Token contains one or more claims and every claim contains some specific information. The token is digitally signed by token issuer when it’s created, so that it can be verified at the receiver end. Token can also contain additional information e.g. expiry date or id.
Figure 2. Security Token Structure.

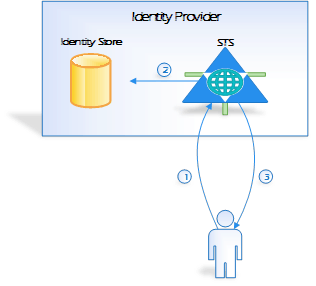
User identity is stored and verified in one central place called Identity Provider. Identity Provider gives information (list of claims) about a user that are utilized in application in authentication and authorization process. Identity provider consists of Security Token Service and Identity Store. Identity Store contains information about user identity – it can be based on database store or AD. Security Token Service (STS) is responsible for handling user requests and creating tokens. To verify and create user identity STS acquires information stored in Identity Store.
The figure above illustrates the authentication process. The process is composed of 3 steps:
1. User (via application) sends authenticate request (with credentials) to STS
2. STS verifies user credentials, gets information about identity
3. STS creates and returns token
Communication between user (application) and STS is provided by using the standard protocol WS-Trust. WS-Trust is a WS-* specification and OASIS standard that provides extensions to WS-Security, specifically dealing with the issuing, renewing, and validating security tokens. The request is authenticated in some way, such as by providing a Kerberos ticket, a password from the user, certificates or something else. Typically, the request contains both, the name of the user for whom this token should be issued and a URI identifying the application the user wishes to access. During communication token is serialized using SAML. Security Assertion Markup Language (SAML) is an XML standard that helps to secure web domains to exchange user authentication and authorization data. Using SAML, an online service provider, can contact a separate online identity provider to authenticate users who are trying to access secure content.
The claims-based identity mechanism can be used to build authentication and authorization process in application. Based on a token issued by STS, an application can verify whether user is authenticated as well as define user rights. Received token can be also used to authenticate in other application and services (SSO support). In the figure below a communication flow between STS and Web Service via client application has been presented.
Figure 5. Web Service with STS.

1. The client initializes and sends (via application) authentication request to the STS. The request contains client’s credentials required to authenticate the client.
2. The STS validates the client’s credentials.
3. The STS issues a security token to the client. If the client’s credentials are successfully validated, the STS issues a security token (such as a SAML token). The token contains claims which represent user identity.
4. The client (via application) sends a request message to the service. The request message contains the received token.
5. The service validates the security token and processes the request. To validate token connection between service and STS is not necessary – issuer validation is based on PKI (this mechanism will be described in detail in the next article)
6. (Optional) The service initializes and sends a response message to the client.
Active vs Passive STS
The claims-based authentication and authorization mechanism is generally used in web application. Communication between web application and STS can be made in two modes : passive and active. Which kind of communication will be used depends on STS type. STS can be categorized into two basic groups: Passive and Active.
Active STS is a special type of web service, which is based on WS-Trust protocol. Passive STS is generally a special kind of web site, where user is redirected during authentication process. User authentication credentials are given on STS login form. After authentication process user is redirected to source application.
In the next series of articles a practical aspect of both (passive and active) approaches will be presented.
WIF
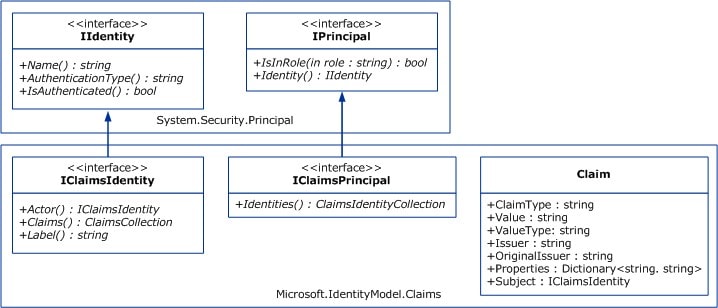
The claims-based identity has been evolving within the Microsoft .NET Framework during the last few years. WIF (Windows Identity Foundation) was designed to unify and simplify the claims-based identity approach. WIF (current version 4.5) is a set of .NET Framework classes for implementing claims-based identity. In ASP.NET and Windows Communication Foundation (WCF) technologies IIdentity and IPrincipal interfaces are used to work with the user’s identity information. WIF extends these interfaces, as illustrated in the following diagram:
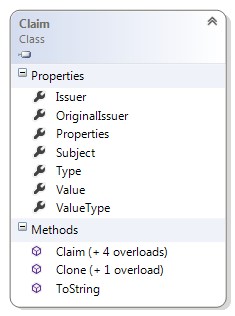
Identity interface allows to verify whether authentication process has finished successfully (IsAuthenticated () method). ICliamsIdentity extends this interface to access to claims collection. Windows Identity Foundation represents a claim within the Claim class.
Claim.ClaimType is a string that tells you what the claim means.
E.g. (typically a URI): http://schemas.xmlsoap.org/ws/2005/05/identity/claims/dateofbirth.
Many predefined claim types have been defined in WIF –class ClaimTypes contains all predefined claims types. This claim type list can be also extend – it is possible to create our claim type definition and use it in our solution. The type of the claim allows to read its value from Claim.Value.
Authorization mechanism can be built using IsInRole method on the IPrincipal interface. Checking access based on roles is called Role-Based Access Control (RBAC). Special type of claim called Role (http://schemas.microsoft.com/ws/2008/06/identity/claims/role) allows to define user roles. The IsInRole method verifies, based on this claim, whether user belongs to the specified role.
Sample code:
  //create Claim Identity
            var userIdentity = new ClaimsIdentity("Identity");
            userIdentity.Label = "Identity";
            userIdentity.AddClaim(new Claim(ClaimTypes.Name,"Sample User"));
            userIdentity.AddClaim(new Claim(ClaimTypes.NameIdentifier,"1"));
            userIdentity.AddClaim(new Claim(ClaimTypes.Country, "PL"));
            userIdentity.AddClaim(new Claim(ClaimTypes.Email, "sampleuser@test.pl"));
            userIdentity.AddClaim(new Claim(ClaimTypes.Role, "Admin"));
            userIdentity.AddClaim(new Claim(ClaimTypes.Role, "User"));
            var identity = new ClaimsPrincipal(userIdentity);

            //isAuthenticated ??
            bool isAuthenticated = identity.Identity.IsAuthenticated;
            Console.WriteLine("isAuthenticated:{0}", isAuthenticated);

            //List of claims values
            Console.WriteLine("Claims:");
            foreach (var claim in identity.Claims)
            {
                Console.WriteLine("Claim:{0} Value:{1}", claim.Type, claim.Value);
            }

            Console.WriteLine("Roles:");
            var isAdmin = identity.IsInRole("Admin");
            Console.WriteLine("isAdmin:{0}", isAdmin);
            var isSuperAdmin = identity.IsInRole("SuperAdmin");
            Console.WriteLine("isSuperAdmin:{0}", isSuperAdmin);
            var isUser = identity.IsInRole("User");
            Console.WriteLine("isUser:{0}", isUser);
Execution result:
Figure 8. Code execution result.

In a web application AuthorizeAttribute.Roles can be used to verify user role.
    [Authorize(Roles = "SuperAdmin,Admin ")]
    public class HomeController : Controller
    {
    //...
    }
Authorization mechanism , as well as claims values can be used to verify user rights – some additional claim called e.g. userPermission can be added and this claim can contain information about user permission.
In a real environment user identity (ClaimsIdenity) is created using a security token received from STS . Below, sample code with which allows creating ClaimsIdenity object from SecurityToken.
private ClaimsPrincipal CreateUserIdentityFromSecurityToken(SecurityToken token)
        {
            var genericToken = token as GenericXmlSecurityToken;
            var handlers = FederatedAuthentication.FederationConfiguration.IdentityConfiguration.SecurityTokenHandlerCollectionManager.SecurityTokenHandlerCollections.First();
            var cToken = handlers.ReadToken(new XmlTextReader(new StringReader(genericToken.TokenXml.OuterXml)));
            var identity = handlers.ValidateToken(cToken).First();
            var userIdenity = new ClaimsPrincipal(identity);
            return userIdenity;
Existing Solution based on claims
Nowadays popularity of Claims-based identity solutions is still increasing. There are many commercial and open source solutions e.g. :
- ADFS (Microsoft)
- Oracle Security Token Service
- WSO2 Identity Server
- Thinktecture IdentityServer
Using WIF, we can also build our own solutions based on claims.
Summary
In this article the approach to authentication and authorisation process based on claims has been presented. What is more, there has been possibility to also present a WIF technology (basic part of WIF), which allows to build claims-based identity solution on .NET platform.
The next article will describe technical approach to STS – demonstration of how to build our STS based on user/password authentication.
